
Crumbl cookies are a unique style of cookie, known for their format: very large, soft cookies with a thick texture, often loaded with mix-ins (chocolate, nuts, caramel, chips) and often topped with frosting. The Crumbl concept was built on a menu that is regularly updated every week, with the recurring presence of the ‘Always Available’ position alongside seasonal/limited flavors.
Why these Crumbl cookies are so ‘addictive’:
- Size. Each cookie feels like a dessert, rather than a ‘snack with tea’.
- Texture contrast. Outside – a crisp edge, inside – soft, chewy, while some are more ‘underbaked’.
- Decoration like in a confectionery. Cream cheese, buttery frosting, ganache, caramel swirls – all of these can be easily made at home, if you know the right procedure and temperature.
Content
Basic Crumbl cookie recipe (a universal base for any flavor)
This is the ‘skeleton’, on which you can build dozens of flavors: from classic chocolate to ‘cheesecake style’ with cream and mix-ins. A specially adapted recipe under thick cookie, which does not spread in the oven and remains soft in the center.
Quick ‘recipe card’
- Yield: 10–12 large cookies (about 95–110 g each)
- Preparation: 20–25 min
- Chilling the dough: 30–60 min (very recommended)
- Baking: 10–12 min/portion
- Total: ~1 hr 15 min (including chilling)
Ingredients (grams in grams – for a stable result)
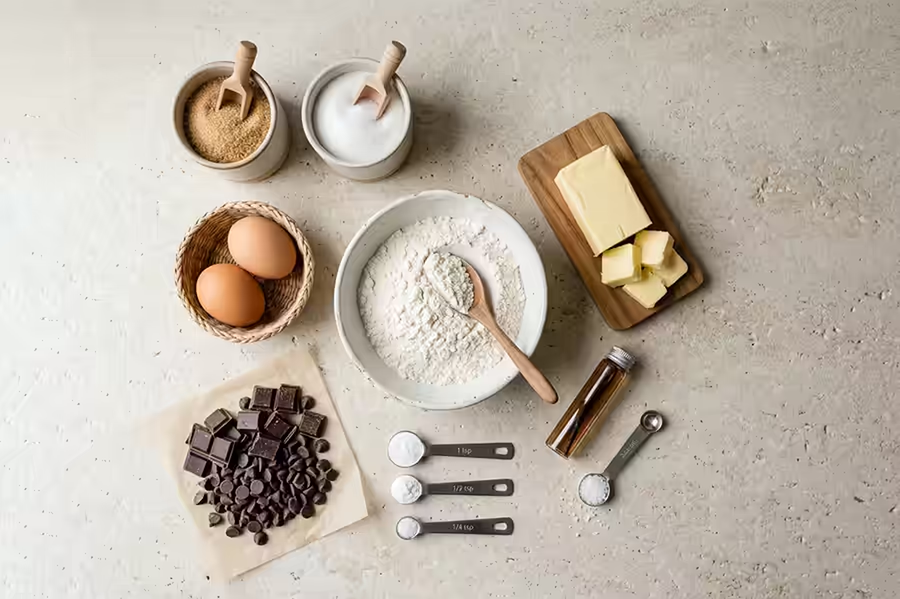
Butter and sugar
- Unsalted butter 82% – 180 g, soft (but not melted)
- Granulated sugar – 130 g
- Brown sugar – 140 g (can be dark or light)
Eggs and yolks
- Eggs – 2 pcs (better at room temperature)
- Vanilla extract — 2 tsp (or vanilla sugar 15–20 g)
Dry ingredients
- Borosilicate flour — 360 g
- Cornstarch — 20 g
- Baking powder — 1 tsp.
- Soda — 1/2 tsp.
- Salt — 1/2 tsp.
Base (basic variant)
- Chocolate chips/chopped chocolate — 250–320 g (as desired)
If you want ‘as in American bakeries’ — don’t skimp on the base. In Ukrainian-style baking, it should also be airy; otherwise, it just becomes a large regular cookie.
Preparation: equipment and precise settings of the oven
If the dough comes out thick and soft, it significantly depends not only on the ingredients but also on the technique.
What is needed
- Weights (critically important for dough thickness)
- Mixer (hand or planetary) or whisk + spatula
- 1–2 layers of parchment, parchment paper
- A sieve for sifting
- A spoon for mixing or just your hands (but remember to wash your hands)
Oven temperature
- Start: 180°C top-bottom.
- If the oven is aggressive/overheats: 175°C.
- Convection (ventilation): usually minus 10–15°C.
Why this is important: the dough doesn’t ‘dry out’ but quickly captures moisture, leaving the center juicy. Overheating the dough can lead to dryness, while the middle remains cheese; it is better to reduce
Detailed preparation (step by step + explanations of “why this way”)
Step 1. Prepare the baking dish
Grease the dish with parchment. If you have thin paper, it’s better to use two (or place another under it) — this way, it won’t stick less.
Step 2. Melt the butter with sugar correctly (not ‘to transparency’)
In a large bowl, melt the butter, white and brown sugar, for 2–3 minutes until fluffy.
Why not overdo it?
In baking, we don’t want to excessively ‘beat’ the dough, like in biscuit recipes. If overmixing occurs, the structure will be thicker, and not just bready— and the dough might turn out drier.
What should the butter be like?
- Correct: Soft, easy to sell palm, but not shiny and rare.
- Incorrect: melted. Melted butter = baked has a stronger melting point.
Step 3. Add the egg and vanilla
Beat the egg until combined, whisking only to combine. Add the vanilla.
Tip: if the egg is too cold, the butter may “clump together”. This is not catastrophic, but better if the egg is at room temperature.
Step 4. Dry the mixture separately
Separately mix the flour, cornstarch, baking soda, and salt.
Why cornstarch?
Cornstarch reduces “graininess” of the dough and gives a softer center — this is what associates with crumb-cookies.
Why baking soda and salt?
Baking soda gives a stable rise, salt enhances flavor and helps the “baked” profile. In pairs, they work better for thicker format.
Step 5. Combine dry and wet (and stop mixing in time)
Add the dry mixture in 2–3 additions and mix with a spatula or mixer at minimal speed only to combine the dry ingredients.
Fastest reminder: mix for “just 1 minute for coherence”. This starts the easy development of gluten — baked comes out softer.
Step 6. Add the nuts
Incorporate chocolate (250–320 g). If you use chopped chocolate, work with different sizes of pieces: small give a nice taste in each bite, large — “chocolate chips”.
Step 7. Chill the dough (this helps in success)
Cover the dough and place it in the fridge for 30–60 min.
Why is this important for Crumbl cookies:
- Fat sets → baked less melts.
- Flour collects moisture → texture stays even.
- Pieces “dissolve” → baked yield more noticeable.
If you plan to shape content/photo — chilling the dough gives nicer color and density.
Step 8. Divide the dough into large portions (weights!)
Weigh about 95–110 g for each piece. Scoop, then slightly roll plus more (density about 2–2.5 cm).
Base for the “pekar’s look”:
Form the dough so that the top consists of three ‘level’ layers (neither of two vertical sheets of dough). The level upper looks more beautiful and appears larger “hurdle”.
Step 9. Bake briefly, not to “dry”
Bake for 10-12 minutes at 180°C.
Temperature readiness indicators:
- The edges are shriveled and the three layers are airy.
- The center looks moist and may appear wet — that is expected.
- When you noticed that the center becomes dry and solid in the oven — it means it is already overbaked.
Step 10. Let the crumb “dough” on the deck
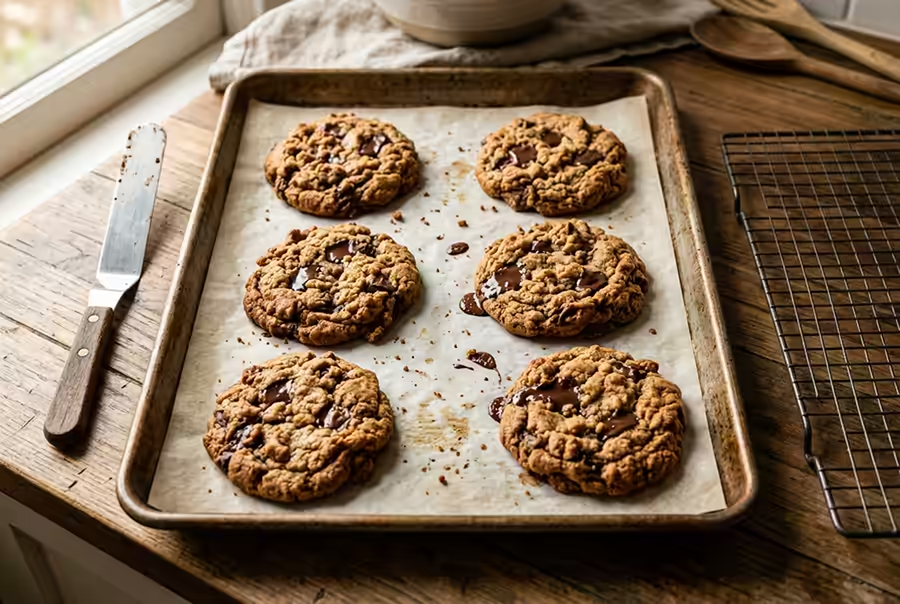
Leave the crumb cooking on the hot deck for 10 minutes. Afterward transfer to the grid for complete cooling.
This is not a detail: the crumb cooking accumulates from the leftover heat, and the structure stabilizes. If you take a picture — it may appear shiny, while the inside is “popping”.
Creams and toppings: how to make crumb-style is expected
In Crumbl cookie, cream is sometimes important not only for the dough but also for the upper layer (cream/glaze/ganache). Below — 3 basic variants that cover 80% of the “doughs like Crumbl”.
1) Universal cream cheese (for “cheesecake”, lemon, berry, red velvet styles)
- Cream cheese — 200 g (chilled)
- Butter — 70 g (softened)
- Sugar powder — 90-130 g
- Vanilla — 1 tsp.
- Salt — a pinch
How to make:
Whip butter with sugar for 1-2 minutes. Add cream cheese and vanilla, whip only until uniformity.
How to prevent rodent cream:
Don’t forget long, don’t reheat the mixture with your hands, and apply cream directly onto the cool surface before baking.
2) Buttercream (classic for “pink sugar” and sweet glaze colors)
- Butter — 120 g (softened)
- Powder — 180-220 g
- Milk/cream — 1-2 tbsp.
- Vanilla or almond aroma — to taste
- Coloring — at your discretion
Advice: if the cream goes over sweet, add a little salt and 1 tsp. of lemon juice — the taste becomes “doctest”.
3) Chocolate ganache (effective and very simple)
- Chocolate — 150 g
- Cover 30-33% — 120 g
- Salt — a pinch
How to make:
Prepare chocolate ganache (do not skip actively), pour in chocolate, wait 2 minutes, stir until smooth. Allow to cool until it thickens, when it no longer flows, but rather “sits” like a “blob”.
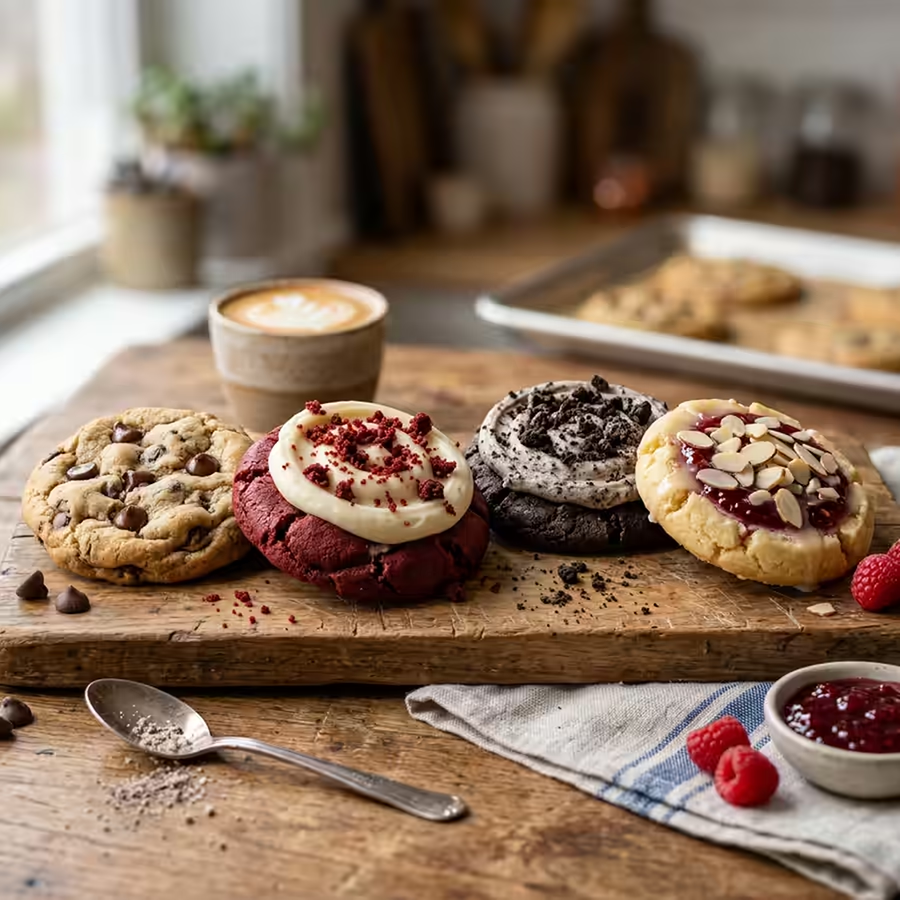
Variations of crusts (15 servings + exact changes)
Below are all the variants calculated for 1 portion of basic dough with 1/3 parts (10–12 large cookies at 95–110 g each). Where necessary — I write, which to replace (e.g., “minus 30 g butter, plus 30 g cocoa”).
1) Milk Chocolate Chip (classic milk chocolate)
- Additions: 280–320 g of milk chocolate (chopped or in a block).
- Finish: fine pieces of plastic frosting after baking (optional).
- Serving: preferably ice cold, when the chocolate is soft.
2) Semi-sweet Chunk + Sea Salt (dark chocolate + salt)
- Additions: 280–320 g of semi-dark chocolate 50–60%.
- Finish: 1–2 chips of plastic frosting on each cookie after baking.
- Advice: the chopped chocolate gives a “muddy” effect and looks more effective in the photo.
3) Double Chocolate (double chocolate)
- Substitution: minus 35 g butter, plus 35 g dark cocoa.
- Additions: 250 g of chocolate chips (better mixed milk and dark).
- Finish: ganache (see. Part 1/3) or simply another 15–20 g of chocolate on top, while the cookie is warm.
4) Brownie-style Fudge (chocolate “brownie” effect)
- Substitution: minus 40 g butter, plus 40 g cocoa.
- Add to the “moker”: 1 tbsp. of sour cream or Greek yogurt (adds moisture).
- Additions: 200 g of chocolate + 80 g of waxy nuts (optional).
5) Cookies & Cream (Oreo-style)
- Additions: 160–200 g of crushed chocolate sandwich cookies (part — in the dough, part — for decoration).
- Plus: 120–180 g of white chocolate (not mandatory, but it feels very “creamy”).
- Top: cream cheese + crushed cookies.
6) Birthday Cake (vanilla + sprinkles + glaze)
- Additions: 70–90 g of colored sprinkles (high quality, that does not dye the dough in a bold color).
- Flavoring: 1–2 tsp vanilla (may vary slightly more or less than base).
- Top: buttery cream, and on top of that sprinkle.
7) Pink Sugar (almond-vanilla with rose cream)
- Flavoring in the dough: 1/2 tsp almond extract (if you like).
- Without chocolate: do not add any, so that the cream’s taste is dominant.
- Top: buttery cream + rose-colored granules, almond flavor dominant.
8) Snickerdoodle (cinnamon-sugar)
- Without chocolate.
- Dough: 80 g sugar + 2–2.5 tsp cinnamon + a pinch of salt.
- How to make: roll each piece of dough in sugar, shape as the base; after cooling, you can add a thin “vanilla” glaze (powdered + milk).
9) Churro-style (cinnamon + topping cream)
- Like snickerdoodle, but add cream on top.
- Cream: 200 g cream cheese + 70 g butter + 110 g powdered sugar + 1/2 tsp cinnamon.
- Decoration: a light “whirlwind” of cream and a pinch of cinnamon.
10) Peanut Butter Chocolate (peanut + chocolate)
- Substitution: reduce butter to 150 g, add 90 g peanut paste (classic).
- Additions: 200 g chocolate chips.
- Top: cream cheese + 2–3 tbsp peanut butter (blend to be smooth).
11) PB & Jelly (peanut + “jam”)
- Dough: like in Peanut Butter Chocolate, but chocolate can be reduced to 120–150 g or removed.
- Top: thin layer of cream (peanut or cream cheese) + 1–2 tsp thick jam in the center (raspberry/plum).
- Tip: jam should be applied to cold cream, so that it will not spread.
12) Salted Caramel (salty caramel)
- Additions: 180–220 g chocolate + 80–120 g caramel candy pieces (chopped) or caramel bits for baking.
- Top: cream cheese + caramel (homemade or store-bought) in a thin coating + plastic fine salt.
- Tip: if you take candy bars, crush them into 1 tsp of sugar — less “potent” on the palate.
13) Lemon Cheesecake (lemon “cheesecake”)
- In dough: 1–2 lemons zest (only yellow part).
- Top: cream cheese + 1–2 tbsp lemon juice + a bit more zest.
- Option: in the center, add 1 tbsp of lemon curd immediately after cooling down (that way it tastes fresher and tastier).
14) Strawberry Cream Cheese (filling + cream)
- In the dough (preferably dry taste, without extra moisture): 30–50 g of folded flour, crushed into powder, or 1–2 tbsp of granulated flour.
- Top: cream cheese + 2–3 tbsp of thick fruit jam (you can also add a sprinkle of icing sugar).
- Decoration: crushed rolled flour.
15) Apple Pie / Caramel Apple (apple pie-style)
- Add-ons: 140–180 g of diced small apples, previously sautéed for 5–7 min in 10 g of oil + 1 tbsp of sugar + cinnamon, leave to cool.
- Plus: 60–80 g of chopped walnuts or pecans (optional).
- Top: thin vanilla glaze or cream cheese + caramel.
16) (Bonus) “Red Velvet” without extra sweetness
- Replacement: minus 20 g of flour, plus 20 g of cocoa.
- Color: 1–2 tsp of gel red food coloring (optional).
- Top: classic cream cheese, without sour additives.
17) (Bonus) Espresso / Mocha (coffee-chocolate)
- Replacement: minus 25 g of flour, plus 25 g of cocoa.
- Add: 2 tsp of ground coffee (powder) in dry mixture or dissolve in 1 tbsp of hot water and add to the “moist”.
- Top: ganache + coffee granules or cocoa.
How to combine variations “like a constructor”
- Base flavor: vanilla/cocoa/cedar/almond/cinnamon.
- Texture: chocolate “crunch” (chip-like) or uniform granules.
- Top: cream cheese (less sweet), fatty (thicker), ganache (chocolate, shiny).
- “Joker” in the center: 1 tsp of curd/jam/caramel right after removal from the heat (best for the form).
Advice, notes, storage, content, and FAQ
1) Most common problems and how to fix them
Crumble cookies crumble into flour
- Reason: warm dough/melted butter, insufficient flour (it may stick together), warm decoration.
- Solution: cool dough for 45–60 min; form quickly; bake on cold tray; check that the butter is soft, not liquid; check the flour.
Crumbl cookie the dough is dry and firm
- Reason: over-bleached; generally long enough to leave the boron after addition; small portions (60–70 g) as for “crumble.”
- Decision: reduce the time to 1–2 hours; remove the mold when the center looks soft; mix only to combine; yield 95–110 g per piece.
Crumble cookie “cakes” (fluffy, without juiciness)
- Reason: usually long has been keeping butter with sugar or after eggs.
- Decision: reduce 2–3 hours to fluffiness, but not “to the blizzard”; after adding boron — minimum movements.
Chocolate “sparkling” or dark
- Reason: generally fine crumbs, little starting or low-quality chocolate.
- Decision: use partially rubbed plate; increase chocolate to 300+ g per portion.
Rare cream and fluid
- Reason: warm baking; cream cheese generally soft; long keeping.
- Decision: baking may need to be at room temperature; cream cheese — cold; reduce to short; for needs thaw cream 10–15 mins before serving.
Low bottom, upper plate
- Reason: thin deck/mold tend to shrink.
- Decision: raise the deck; elevate the level in the dough to a higher standard; lower temperature by 5–10°C and add 1 hour time.
2) Storage and freezing crumbl cookie
- Without cream: keep in a hermetic container for 2–3 days at room temperature.
- With cream/topical toppings: keep in the fridge for 3–5 days; before serving give 10–20 mins to settle, so the texture becomes softer.
- Freezing dough (best variant): form balls of 100 g, keep in pieces for 1–2 years, then in the pack; thaw from frozen, adding 1–3 mins.
- Freezing finished crumble cookies: may, but cream cheese after thawing noticeably changes texture, also better to make fresh.
When preparing for people with allergies, keep in mind the possible cross-contact of ingredient in the kitchen. At Crumbl there is also a warning that even with absence of that ingredient in a specific product cross-contamination is possible, since we work in a kitchen with typical allergens (milk, eggs, nuts, flour etc.).
3) Time plan “for 2 days”
Day 1 (20–30 minutes of active time)
- Replace the dough.
- Chill for 30–60 minutes.
- Form balls of 100 grams each (you can divide them into portions).
- Prepare the cream (or cream base), put it in the refrigerator.
Day 2 (30–45 minutes of active time)
- Bake the batch (10–12 minutes).
- Cool completely (minimum 40–60 minutes).
- Apply the cream, add the decoration.
- Remove the photo: 1 ‘hero’, 1 cut, 1 frame with texture and crumbs.
4) Recommendations for photos and ‘restaurant view’
- Make 1 ideal sample for the cover, the rest — as a recipe.
- For the cut: cut the chilled sponge with a pastry knife, then reheat for 3–5 minutes to soften the edge in the microwave so that the chocolate ‘melts’.
- Decoration: sponge crumbs, chocolate pieces, thin caramel lace — give a ‘premium’ appearance without layered texture.
- Light: side natural (by the window) + white reflector (paper arc) with a protective backdrop.
5) Big FAQ
Why is cream so big — is it an overwhelming?
No, but the large size gives the right balance: the edges are crispy while the center remains soft.
Can you make ‘thin and crispy’ cream?
Possible, but this is a different style. For thin layers reduce the borscht and keep the depth, while ‘cream-effect’ usually refers to thickness.
How to ensure the sponge is level and round?
Shape after cooling (while soft) ‘cover’ the cream layer with a round spatula/slanting movements — the edge will become flat.
Can I replace part of the butter with oil?
Technically yes, but the butter gives flavor and structure. With oil, the sponge usually breaks down more and has a different texture.
What is the best starting chocolate?
Milk chocolate or milk and dark mix — the most stable option for the first attempt.
How to start making a surprise at the center?
It’s simplest: after extraction, make a small pastry in a warm crumb cake and add 1 tablespoon of curd/butter, or take a small piece of chocolate to include in the dough (but be careful, so that it doesn’t burn on the surface).
How to make “less sweet,” so that the texture doesn’t get damaged?
Reduce the sugar by a maximum of 10–15% and use cream less sweet (cream cheese). This way, you will preserve the softness and won’t get dry crumb like.
Is it possible to make it gluten-free?
You could try replacing 1:1 with gluten-free flour for baking, but the structure will be different; I recommend testing a partial mixture.
Is it possible to make it lactose-free?
It is possible if you use non-lactose butter/cream cheese (or plant-based analogues), but it’s better to choose a stable one that blends well.