
Filo dough is not just an ingredient, it is the magic of Greek and Balkan cuisine, which has won the hearts of millions of people around the world. If you have ever tried a crispy, layered mAs it is elegant, they didn’t even know that Philo’s very dough creates this charm. But here the question arises: how to cook it? How not to break these tiny leaves? And why do some people cook for 30 minutes and others cook for an hour?
Let’s sort it out together. In this article you will find everything you need to know about Filo dough – from choosing the right dough in the supermarket to cooking the most delicious dishes. We will share top recipes that will accurately impress your family, provide practical tips for working with this capricious but very grateful dough, and give answers to all the questions you may have.
Content
What is filo dough? History and features
The name of the filo dough comes from the Greek word φλλο, which means “leaf”. This is no accident – the dough really consists of very thin leaves, transparent as paper. According to legend, it was invented by the Greeks, and even in the Homeric “Odyssey” (written around 800 BC) such thin breads sprinkled with walnuts and honey are mentioned.
Unlike puff pastry, filo consists of separate sheets, which are smeared with oil together, not stacked together. This gives a characteristic layering and crisp. The dough is prepared from only three components: flour, water and a small amount of oil – which is why it dries quickly enough.
It is difficult to prepare Filo dough on your own at home and requires experience and skill. That is why most people use ready-made frozen dough, which is easy to find in the supermarket.
How to work properly with Filo dough: golden tips
Before moving on to recipes, you need to know a few important rules for working with this capricious but very grateful dough.
1. Defrost the dough properly
This is the first and most ardent step. Remove the package of filo dough from the freezer and place it in the refrigerator overnight (or for several hours). You can thaw it at room temperature, but the dough can dry out.
2. The dough dries very quickly – work quickly
Filo dough contains a minimum of oil, so it is weathered instantly. While you are working with one sheet, cover the other with a damp kitchen towel or a piece of parchment paper. This is the most important tip – without it your dough will be brittle and unfit for work.
3. Grease generously with oil
The more butter, the tastier the result. Traditionally, between each sheet is melted butter with a cooking brush. Do not be afraid of butter – it makes the dough crispy and aromatic.
4. If the letter is torn – not a problem
If the leaf is torn during work, it is not a catastrophe. Apply the second sheet on top, grease with oil, and no one will notice. Some “slovenliness” in dishes even gives them a stylish look.
5. Prepare the filling in advance
Before you start working with the dough, fully prepare all the components of your filling. Start cooking apples, frying mYasa, slicing cheese – do it all in advance. When the dough is thawed, every minute is worth its weight in gold.
Top 5 detailed recipes with filo dough
Recipe 1: Crispy puffs with Filo and apples

This is one of the most popular recipes that will conquer each of the first bites. Apple filling with cinnamon and honey is a classic that never goes out of fashion.
Ingredients:
- Filo dough – 1 pack (8-10 sheets)
- Apples – 5-6 large
- Butter – 150 g
- sugar – 3-4 tbsp. l.
- honey – 2 tbsp. l.
- ground cinnamon – 1-2 tsp.
- Walnuts (optional) – 100 g
- zest of half a lemon
- water – 2 tbsp. l.
Preparation (detailed step-by-step recipe):
Step 1: Preparing Apples
Peel the apples, remove the core and cut into cubes of 1-1.5 cm (not too small so that they do not boil into porridge). Place the apples in a separate bowl.
Step 2: Caramelization of Apples
Melt 100 g of butter in a thick bottomed pan over medium heat. Add 3 tbsp. l. sugar and stir constantly until golden syrup is formed. Be careful that the sugar does not burn.
Add the apples to the syrup, stir for 2-3 minutes over medium heat. Apples should be caramelized and mHow to but keep the form. About 5-7 minutes.
Add honey, ground cinnamon, lemon zest and walnuts (if you use). Mix everything well. Remove from heat and allow to cool for 15-20 minutes to room temperature.
Step 3: Preparing the Form
Preheat the oven to 180-190 ° C. Cover the protein with parchment paper.
Step 4: Dough Decomposition
Remove the package with the filo dough. Cut each leaf in half lengthwise to form two strips 20-25 cm wide.
Take one strip of dough on a board or parchment. Grease with melted butter with a brush.
Step 5: Forming Puffs
Place about 1 tbsp on the bottom edge of the strip. l. apple filling. Bend one bottom corner with a triangle (as you wrap the flag). Then bend the second corner, forming a triangle. Continue wrapping until the entire strip is over.
Spread each finished triangle on the vintage, grease the top with oil.
Step 6: Baking
Put the protrusion in a preheated oven. Bake for 18-22 minutes until the leaves turn golden. In the middle of the baking, you can remove the vulture and turn some puffs for a uniform zarumYannya.
Step 7: Cooling and Serving
Remove from the oven, let cool for a few minutes, then sprinkle with powdered sugar (optional) or cinnamon sugar. Serve warm as a dessert to tea or coffee.
the way out: About 16-20 puffs
Cooking time: 40-45 minutes
Recipe 2: Salty Triangles with Filo and Chicken
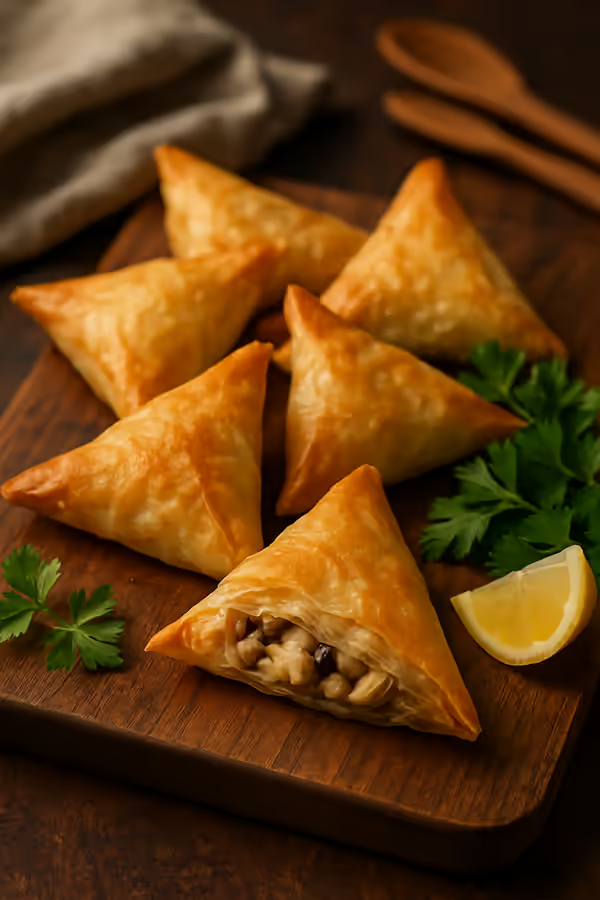
This recipe is perfect for snacks, dinners or a holiday table. MClear filling with spices is a refined combination of flavors.
Ingredients:
- Filo dough – 1 pack
- Chicken fillet – 400 g
- Onions – 1 large
- Sour cream – 100 ml
- Hard cheese (you can cheddar or parmesan) – 100 g
- Garlic – 2-3 cloves
- olive oil – 2 tbsp. l.
- Butter – 150 g for lubrication
- salt, black pepper, paprika – to taste
- Fresh parsley – for decoration
Cooking:
Step 1: Roasting chicken and onions
Cut the onion very finely. Heat 2 tbsp over medium heat in a frying pan. l. olive oil. Fry the onions to mas a golden color (about 3-4 minutes).
Cut the chicken fillet into small cubes. Add to onions, fry for 7-10 minutes until mThe meat will not be completely cooked and will not turn white.
Step 2: Adding Spices and Toppings Forming
Add finely chopped garlic, fry for 1 minute. Add sour cream, sprinkle with paprika, salt and black pepper to taste. Stir.
Remove from heat and leave to cool for 10-15 minutes. Then add the grated cheese (choose hard cheese to melt well) and finely chopped parsley. Stir.
Step 3: Forming Triangles
Preheat the oven to 180 ° C.
Cut each sheet of dough in half lengthwise, forming two levels of strips. Grease each strip with melted butter.
On the lower left corner of the strip, lay out about 1 tbsp. l. Mclear filling. Bend the strip with a triangle (as you wrap the flag), alternating diagonally. Make sure the edges are well closed.
Step 4: Baking
Place the triangles on a protub, covered with parchment. Grease each on top with oil. Bake for 20-25 minutes until golden brown.
the way out: About 16-18 triangles
Cooking time: 50-60 minutes
Recipe 3: Cherry Pie and Filo (without egg filling)
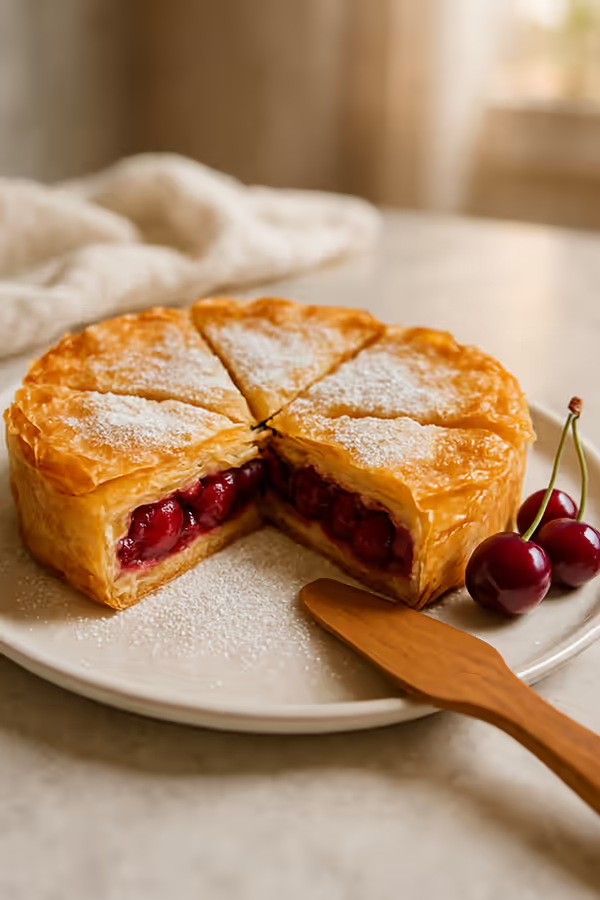
A light, refreshing cake, perfect for summer tea or as a light dessert.
Ingredients:
- Filo dough – 1 pack (400 g)
- Cherry (fresh or frosted) – 500-600 g
- Butter – 200 g
- Sugar – 150 g
- honey – 3 tbsp. l.
- brown sugar – 2 tbsp. l. (for sprinkling)
- Lemon zest – 1 tsp.
- vanilla – 1 tsp.
Cooking:
Step 1: Preparing the Cherry
If you use frosted cherries, thaw it at a computer room temperature. Remove the bones (if any).
Put cherries in a bowl, add 150 g of sugar, honey, lemon zest and vanilla. Mix well. Leave for 20-30 minutes for the cherries to release the juice.
Step 2: Preparing the Shape and Baking
Preheat the oven to 180 ° C. Grease the form (diameter 28-30 cm) with melted oil.
Defrost the filo dough. Place 4-5 sheets of dough on the bottom of the form, lubricating each leaf with melted butter.
Step 3: Adding Cherries
Spread the prepared cherries with juice on the dough, distribute evenly.
Step 4: Top Layer
Put another 4-5 sheets of dough on the cherries, again lubricating each with oil.
Step 5: Baking
Sprinkle the top layer with brown sugar for beauty. Put in the oven for 30-35 minutes until the top layer is golden and crispy.
the way out: 8-10 servings
Cooking time: 50-60 minutes (without a cherry infusion count)
Recipe 4: Filo and Cream Cheese Rolls
Simple, fast and incredibly tasty. This recipe is suitable for both breakfast and light dinner.
Ingredients:
- Filo dough – 1 pack
- Processed cheese (cheese clots) – 200 g
- Egg – 1 pc.
- milk – 2 tbsp. l.
- Butter – 150 g
- Salt and pepper to taste
- Sesame and flax seeds – optional for sprinkling
Cooking:
Step 1: Preparing the Dough
Defrost the filo dough.
Preheat the oven to 180-190 ° C.
Step 2: Forming Rolls
Cut each sheet of dough in half lengthwise, forming two strips.
Grease each strip with melted butter.
Place a piece of processed cheese on the bottom edge of the strip. Carefully twist the stripe into a roll, forming a tube. The ends can be slightly bent inwards so that the cheese does not come out.
Step 3: Preparing for Baking
Spread the rolls onto the anti-snail.
Beat the egg with milk and salt. Use a brush to lubricate each roll with an egg mixture.
Sprinkle with sesame seeds and flax as desired.
Step 4: Baking
Bake for 15-20 minutes until the rolls turn golden brown.
the way out: About 12-14 rolls
Cooking time: 30-35 minutes
Recipe 5: Snack cake with filo, mushrooms and chicken fillet
A graceful cake that will impress guests. The perfect choice for a holiday table or a special dinner.
Ingredients (for 28×22 cm):
- Filo dough – 12 sheets
- Chicken fillet – 350 g
- Mushrooms (or any mushrooms) – 400 g
- Onions – 1 large
- Hard cheese – 200 g
- Eggs – 3 pcs.
- Sour cream – 100 ml
- Milk – 300 ml
- Butter – 150 g
- salt, black pepper, mYata (or dill) – to taste
- Black sesame – for sprinkling
Cooking:
Step 1: Frying chicken and mushrooms
Finely chop the onion. Heat 2 tbsp over medium heat. l. Oils in the pan. Fry the onions until golden (3-4 minutes).
Cut the chicken fillet into small cubes. Add to onions, fry for 7-8 minutes until mYasa will not be prepared.
Cut the mushrooms thinly. Add to the chicken in a pan, fry together for 8-10 minutes until the mushrooms are reduced in volume and release moisture.
Add salt, pepper and myat to taste. Let cool.
Step 2: Forming the Pie
Preheat the oven to 180 ° C.
Cover the protein with parchment.
Defrost the filo dough. Lay the first sheet on the protrusion. Grease with melted butter.
Lay the second sheet on top, grease again with oil.
Leave this process for the rest of the sheets, forming layers. Arrange the dough so that it forms “boats” on the edges of the form.
Step 3: Adding Filling and Further Forming
Lay out MDistribute the meat and mushroom filling evenly in the center of the form.
Sprinkle with grated hard cheese.
Floor Toppings Lay out the remaining sheets of doughlubricate each with oil.
Step 4: Egg Fill
Beat eggs with sour cream and milk. Add salt and pepper to taste.
Carefully pour the egg mixture over the dough. It should partially soak the sheets and wet the filling.
Step 5: Baking
Sprinkle the top layer with black sesame seeds for beauty.
Bake for 40-45 minutes until the top layer is golden and crispy.
Allow to cool for 10 minutes before serving.
the way out: 8-10 servings
Cooking time: 60-70 minutes
Practical tips for a perfect result
Oven temperature: how to find out which mode to choose?
Majority Recipes with dough Filo is prepared at 180-190 ° C. If your oven heats up unevenly and the edges are set on fire before the filling is baked, reduce the temperature to 170 ° C.
Do not cook at temperatures above 200 ° C unnecessarily – the dough is charred and the filling remains raw.
How to store ready meals with filo?
Ready-made dishes with filo dough are best tasted on the first day, while the dough remains crispy. Store them in an airtight container at room temperature or in the refrigerator for a maximum of 3-4 days.
If you want to cook them in advance, you can collect semi-finished (raw dough with stuffing) and cook shortly before serving. But keep in mind that the raw dough dries quickly, so cover it with a towel.
Ready meals can also be frozen (up to 1 month) and preheated in the oven at 160 ° C for 10-15 minutes directly from the freezer.
How to choose quality filo dough in the store?
When choosing a filo dough in the supermarket, pay attention to:
- Packaging: it should not have ice crystals or defrost traces
- Date of manufacture and expiration date: The fresher the better
- Mark: Popular and trusted brands often have better quality
If possible, choose the dough that was stored in the freezer and not in the freezer section at the entrance to the store.
How to avoid tearing the dough while working?
- Defrost slowly in the refrigerator
- Always cover the sheets with a damp towel
- Do not rush while working
- Lubricate the sheets with oil generously – the oil acts as a lubricant
- If the sheet is torn, do not understand – just put a second sheet on top
How to replace butter?
If you are allergic to lactose or you are trying to cook vegetarian dishes:
- Olive oil – Gives a different taste, but also delicious
- Ghee (GI) – Traditional Indian replacement, gives excellent taste
- Coconut oil – gives a note to the coconut
It is not recommended to use ordinary vegetable oil – it is less aromatic.
FAQ: Frequently Asked Questions About Filo Dough
1. How to defrost the filo dough properly so that it does not dry out?
The answer is: The best way is to thaw in the refrigerator for 3-4 hours or at night. Never defrost at room temperature, as the sheets may dry out.
If you are in a hurry, you can thaw at room temperature for 1-2 hours, but be prepared that some of the sheets may dry out.
2. The dough sheets are torn during thawing. What to do?
The answer is: This means that the dough thawed too quickly or at the wrong temperature. Next time, defrost in the refrigerator.
If the letters are still torn, do not throw them away! Use smaller pieces, put them one on one, lubricate with oil – no one will notice.
3. I accidentally left the dough at room temperature for a long time, and it dried up. Can he be saved?
The answer is: If the sheets become brittle and brittle but not completely crumble, try this:
- Grease each leaf more generously with oil
- Fold them at the bottom of the cake tin
- Fill with more egg filling
The dried dough will still be delicious, just less layered.
4. Is it possible to prepare rolls / triangles in advance?
The answer is: Yes, you can. Take all the molding steps, but don’t bake. Put the blanks on the protagonist, cover with parchment and leave in the refrigerator for several hours or in the freezer for up to 2 weeks.
Bake directly from the freezer, possibly adding 5-10 minutes to cooking time.
5. Filo dough is prepared too quickly, and the filling is still raw. How to avoid this?
The answer is: This means that the oven temperature is too high. Try it out:
- lower the temperature by 10-15°C
- Cover the cake on the first half of baking with foil so that the dough does not ignite too quickly
- prepare the filling in a thinner layer
6. What recipes are best for beginners who are working with Filo’s first time?
The answer is: Start with the simplest recipes:
- Cheese rolls – requires a minimum of 15-20 minutes and very simple movements
- Simple cake – just put sheets one on one, add filling, bake
- Puffs with apples – take some time to form, but it’s a good exercise
Avoid complex forms of spirals such as the first time.
7. How to generously lubricate with oil, but will not overplay?
The answer is: It’s a matter of taste and experience. The general rule: grease each leaf with melted butter so generously that it shines, but does not drip oil. For most recipes, 150 g of oil per package (8-10 sheets) is an optimum.
If you like less fat, you can reduce to 100 g, but beware of drying out the dough.
8. Is it possible to cook filo without butter?
The answer is: Technically yes, but it is not recommended. Without butter, the dough will not be crispy and layered, but will most likely be hot and dry.
If you are following a diet or vegetarianism, use olive oil for minimal amounts or try to soak the leaves in an egg mixture (egg + milk) instead of butter. The result will not be as golden, but it is an alternative.
9. What is the difference between frozen and fresh filo dough?
The answer is: Frozen Filo dough in most cases is almost no different from fresh after thawing. Fresh dough is not available for sale in Ukraine, unless you live near a specialized store of Greco-Balkan cuisine.
However, if you find fresh dough, it will definitely be more ductile and easier to work with.
10. How many Filo dough sheets in regular packaging?
The answer is: Usually the packaging contains 8-10 sheets, depending on the manufacturer. Check the packaging before buying.
One packaging is usually enough for:
- 12-16 rolls
- 15-20 puffs
- 1 medium pie (8-10 servings)
- 16-18 triangles
11. Is it possible to replace the dough with puff pastry?
The answer is: Technically, yes, but the result will be different. Puff pastry has a solid porous structure, while filo consists of individual sheets. Filo dough will be more layered and crispy, puff – more airy and less layered.
If you do not have phyllo, puff pastry will still be a good choice for most recipes, just cook it a little longer (5-10 minutes).
12. How to store the open packaging of Filo dough?
The answer is: If you have any letters left after cooking:
- Remove the parchment from the letters
- Fold the sheets together, cover with cling film
- Place in an airtight container
- Store in the freezer for up to 2 weeks
It is not recommended to store at room temperature – the leaves will dry quickly.
Conclusion: Filo dough is not difficult, it’s fun!
At first glance, working with Philo’s dough seems difficult and even scary. But after receiving a few tips from experts and training on the first few recipes, you will realize that it is much easier than it seems.
Key points:
- Defrost correctly – In the refrigerator, the day before
- Down quickly – The dough dries very quickly
- Cover with a damp towel – This is the most important advice
- Don’t be afraid of mistakes – A broken leaf is not a catastrophe
- Grease generously with oil – This makes the dough crispy and aromatic
Whether you are making sweet puffs with apples, chicken fillet snack triangles or a fine mushroom pie, the result will always be impressive and delicious.
Most importantly – do not be afraid to experiment. Philo dough is a universal “canvas” for your culinary creativity. How you like the taste, structure and shape of your dishes is entirely up to you.
So take the Filo dough pack out of the store, let it thaw in the fridge, and cook something really adorable tomorrow. your sevenIt is a mustDefinitely love it!
Enjoy your cooking and delicious! ?️