
Blanching is one of the basic culinary techniques known to professional chefs, but at home it is often either ignored or confused with regular boiling. In fact, it is a simple and very useful technique that helps preserve the color, texture, flavor, and appearance of ingredients, and also makes further cooking much easier.
Content
Simply put, blanching involves briefly immersing a food item in boiling water or very hot water, followed by rapid cooling, usually in ice water. It is this sharp contrast in temperatures that makes this technique so effective: the food doesn’t have time to cook all the way through, but it undergoes an important preliminary treatment.
At first glance, it might seem like an unnecessary step that you could easily skip. But in practice, it’s often the blanching process that separates a “normal” home-cooked meal from a neat, vibrant, and professional-looking result. Green vegetables stay green, tomatoes are easy to peel, broccoli doesn’t turn into a gray mush, and herbs retain their fresh appearance longer.
Blanching isn’t just for vegetables. It’s also used to prepare herbs, fruits, certain types of meat, offal, bones, nuts, and even potatoes before frying or freezing. It is a versatile technique that can accomplish several tasks at once: prepare the product, clean it, mellow its flavor, remove excess bitterness, or halt enzymatic processes.
What is blanching, in simple terms
Blanching is a brief heat treatment of a food item, followed by rapid cooling. Most often, the food is immersed in boiling water for a few seconds or minutes and then transferred to cold water with ice to stop the cooking process.
The key word here is “brief.” Blanching isn’t meant to cook the food until it’s fully done. Its purpose is to lightly treat the surface or outer layers, altering the structure, color, or flavor, but without completely destroying the texture.
For this reason, blanching is often confused with boiling. The difference is simple: when boiling, the food is cooked until done, whereas when blanching, it is merely prepared for the next step. After blanching, vegetables can be added to a salad, frozen, baked, sautéed, added to soup, or used in another dish where they will be cooked again.
This technique can also be described as “pre-conditioning” the product. It helps make the flavor cleaner, the color brighter, the texture more consistent, and the cooking process more predictable.
Why is blanching necessary?
This technique offers several practical advantages. That is why it is widely used both in restaurants and in home cooking.
The first reason is to preserve color. This is especially important for green vegetables: broccoli, asparagus, green beans, spinach, and green peas. When cooked properly, they look brighter, more appetizing, and much “vibrant” on the plate.
The second reason is to preserve the texture. The vegetable softens slightly but retains its firmness. This is especially useful when you want your vegetables to be al dente rather than overcooked.
The third reason is that it makes peeling easier. Blanching works perfectly for tomatoes, peaches, almonds, and certain other foods that need to be peeled quickly.
The fourth reason is to prepare them for freezing. When vegetables are blanched before freezing, they retain their flavor, color, and texture better after thawing.
The fifth reason is to reduce bitterness or sharpness. For example, certain types of greens, cabbage, or onions become milder and more pleasant to the taste after a brief blanching.
The sixth reason is to clean the product. In some cases, this technique helps remove surface impurities, excess mucus, strong odors, or protein foam, as is often the case with bones or offal.
How does blanching differ from boiling?
This is one of the most important topics, because this is where the most confusion arises. People think they’ve blanched the vegetables, when in fact they’ve simply overcooked them.
During cooking, the dish is brought to completion. The potatoes become soft on the inside, the cauliflower is thoroughly heated through, and the carrots are ready to eat without further preparation. In other words, cooking is a complete process.
Blanching works differently. It doesn’t take long—often just a few seconds to 1–3 minutes, depending on the ingredient. Afterward, the ingredient is either cooled or used immediately in the recipe.
Another difference is the use of ice water. In regular cooking, this step isn’t necessary, but in classic blanching, it’s often essential. It’s the sudden cooling that stops the cooking process and prevents the food from continuing to cook due to its own residual heat.
Simply put, cooking is the final step, while blanching is the preparation.
Which foods are most commonly blanched?
The most common category is vegetables. This is where the blanching technique is used most frequently and with the most noticeable results. It works particularly well for broccoli, cauliflower, asparagus, green beans, spinach, Swiss chard, peas, corn, carrots, and Brussels sprouts.
The second major group consists of tomatoes and fruits with skins. When you need to peel tomatoes for sauce, soup, or canning, it’s hard to do without blanching. The same technique works for peaches, apricots, or nectarines used in desserts and preserves.
The third group is herbs. Dill, parsley, spinach, basil, and leafy greens are sometimes blanched to bring out their color before being chopped into sauces, purées, fillings, or herb oils.
The fourth group is nuts. Almonds are often blanched to make it easier to remove the skin and obtain a clean, light-colored kernel for use in desserts, creams, or marzipan.
The fifth group consists of meat, bones, and offal. The logic here is slightly different: the ingredients are briefly boiled to remove excess foam, blood, strong odors, or unwanted impurities before the main preparation of broth, pâté, aspic, or other dishes.
Where is blanching used?
Blanching is commonly used in dishes where color and presentation are important. These include salads, side dishes, vegetable platters, warm salads, dishes with roasted vegetables, vegetable sautés, stir-fries, pasta dishes, and casseroles.
This method is also indispensable during the harvest season. If you’re freezing broccoli, green beans, peas, corn, or spinach, blanching them first yields much better results after storage.
This technique is used for tomatoes in sauces and soups. It helps quickly peel the tomatoes and makes the sauce’s texture smoother and more uniform.
In desserts, it is used to peel fruit and almonds. It’s a small technical step that significantly affects the dish’s appearance.
In meat cooking, this method is useful when you need to clarify a broth or remove unwanted odors from bones, tongue, liver, kidneys, or other ingredients with a strong aroma.
How to Blanch Properly: Basic Techniques
For blanching to be effective, it’s important not just to “plunge the food into boiling water,” but to follow the correct procedure.
1. Prepare the product
Wash the vegetables, pat them dry, and cut or break them into uniform pieces. This is important because pieces of different sizes will cook unevenly.
Separate the broccoli into florets of roughly the same size. Trim the green beans. Sort through the spinach and wash it. To peel the tomatoes, make a cross-shaped cut in the skin.
2. Bring a large pot of water to a boil
There should be enough water so that the food doesn’t cool the pot down instantly. If there isn’t enough water, instead of a quick blanch, you’ll end up with a slow heating process.
It’s best to add salt to the water right away if you’re preparing vegetables for a side dish, salad, or further use in other dishes. Salt helps bring out the flavor.
3. Prepare some ice water
This is a step that people often forget. Keep a large bowl filled with very cold water and ice next to the stove. That’s where you’ll transfer the food after blanching it.
If you don’t cool the vegetables quickly, they will continue to cook for a while due to residual heat. As a result, you’ll end up with overcooked vegetables instead of blanched ones.
4. Dip the product in boiling water for a short time
The cooking time depends on the type of produce. Delicate greens may only need 10–20 seconds, spinach 20–30 seconds, green beans about 2–3 minutes, broccoli 1.5–3 minutes, and tomatoes for peeling about 20–40 seconds.
The main rule: the product should change slightly in texture but not lose its shape.
5. Quickly transfer to ice water
You should do this right away. Don’t leave the vegetables “sitting in the colander.” The temperature contrast stops the cooking process and preserves their texture.
6. Dry
Once cooled, the product must be thoroughly dried. If this is not done, excess moisture will interfere with subsequent frying, baking, or freezing.
Approximate blanching times for various foods
Below is a handy guide to keep in your kitchen.
- Spinach — 20–30 seconds.
- Leafy greens — 15–30 seconds.
- Tomatoes for peeling — 20–40 seconds.
- Broccoli — 1.5–3 minutes.
- Cauliflower — 2–3 minutes.
- Green beans — 2–4 minutes.
- Green peas — 1–2 minutes.
- Asparagus — 1–3 minutes, depending on thickness.
- Carrot slices — 2–3 minutes.
- Brussels sprouts — 3–4 minutes.
- Almonds — 30–60 seconds.
- Peaches for cleaning — 20–40 seconds.
The cooking time always depends on the size of the pieces, the freshness of the produce, and what you plan to do next. If the vegetable is going to be sautéed or baked after blanching, it’s better to reduce the cooking time rather than increase it.
Blanching Vegetables: The Basic Rules
The appliance is used most often with vegetables, but that’s exactly where it’s easy to make mistakes.
The first rule is: don’t overload the pot. If you add too many vegetables at once, the water temperature will drop sharply, and instead of blanching, the vegetables will start to slowly boil away.
The second rule is to cut them evenly. If you put both thin and thick asparagus spears in the same pot, some will turn out perfect, while others will be undercooked or overcooked.
Rule number three: don’t leave the vegetables in ice water for too long. The purpose of this step is to quickly stop the cooking process, not to “marinate” the vegetables in water. Once they’ve cooled, it’s best to remove them and pat them dry.
Rule number four: Use blanching only when it really makes a difference. Not every vegetable needs to be blanched, but for broccoli, green beans, spinach, peas, and asparagus, it’s often a great choice.
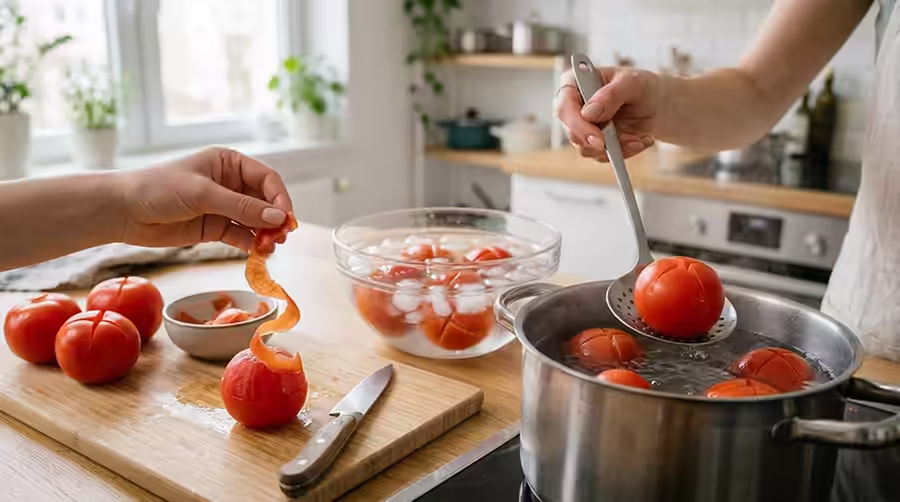
Blanching tomatoes
This is one of the most useful skills in the kitchen. Whether you’re making tomato sauce, cream soup, gazpacho, tomatoes in their own juice, or canning tomatoes, knowing how to peel them quickly saves a lot of time.
The technique is simple. Make a small cross-shaped cut at the bottom of the tomato, submerge it in boiling water for 20–40 seconds, and then immediately transfer it to ice water. After that, the skin comes off almost on its own.
It’s important not to leave the tomatoes in the boiling water for too long. If they stay in the hot water too long, the flesh will start to soften, and the tomatoes will lose their shape.
Blanching greens

This method is particularly useful for spinach, parsley, dill, basil, sorrel, and other herbs when they need to be chopped for sauces, creams, fillings, or herb-infused oils.
Brief blanching helps make the color more vibrant and stable. For example, spinach treated this way works better in purees, pie fillings, green pancakes, or sauces.
But greens are very delicate, so the cooking time should be kept to a minimum. An extra 20–30 seconds can completely ruin the texture.
Blanching for freezing
This is one of the most practical ways to use this technique at home. If you freeze vegetables seasonally, blanching is definitely worth the time.
After briefly blanching and cooling, vegetables retain their natural color, texture, and flavor better. They darken less, become watery less often, and look much more appealing after thawing.
This method works especially well for broccoli, cauliflower, green beans, peas, corn, and spinach. After blanching, they should be thoroughly dried, divided into portions, and only then frozen.
Blanching meat, bones, and offal
Here, the concept of blanching differs slightly from that used for vegetables. In meat cooking, it is often used as a preliminary step in preparation.
For example, bones or meat are covered with cold water, brought to a boil, simmered briefly, then the water is drained, the ingredients are rinsed, and only then is the main broth prepared. This method helps reduce foam, produce a cleaner flavor, and improve the broth’s appearance.
Offal is also sometimes blanched to remove a sharp taste or unpleasant odor. This isn’t a universal rule, but it’s a very useful step in certain recipes.
Advantages
In short, the main advantage of this technique is control. You don’t leave the outcome to chance; instead, you consciously control the color, texture, purity of flavor, and subsequent stages of preparation.
Blanching results in:
- A brighter color.
- A finer texture.
- Best results in salads and side dishes.
- Easier to peel.
- The best way to prepare for freezing.
- Some foods have a milder or cleaner taste.
- A more professional appearance for the finished dish.
This is one of those techniques that may seem like a small thing, but in practice makes a big difference in the kitchen.
Common Mistakes
The most common mistake is leaving vegetables in the water for too long. People worry that the vegetables won’t be cooked through, so they leave them in “just a little longer.” It’s that “little longer” that often ruins the texture.
The second mistake is not using ice water. If you simply drain off the boiling water and leave the food in the colander, it will continue to cook.
The third mistake is using too little water. The temperature drops sharply, and the product doesn’t achieve the desired result.
The fourth mistake is not drying the vegetables properly. This is especially critical before frying or freezing. If the vegetables are wet, they will either start to stew, stick together, or become covered in ice.
The fifth mistake is cooking too large a portion at once. Blanching requires precision, not an overfilled pot.
The sixth mistake is expecting blanching to replace proper cooking. It’s just one step in the process, not a one-size-fits-all method for getting food fully cooked.
How to tell if blanching has been done correctly
There are a few simple signs. First, the product changes color and becomes brighter. Second, it softens slightly but retains its shape. Third, after cooling, it doesn’t look limp or “overcooked.”
Properly blanched broccoli should be a deep green color—not gray and not too soft. Green beans should be crisp but still firm. Tomatoes should peel easily but not fall apart in your hands.
The main criterion is simple: the product should look better than before blanching, not worse.
When blanching isn’t necessary
Not all dishes benefit from this technique. If a vegetable is going to be simmered, boiled, or baked for a long time until completely tender, additional blanching sometimes simply isn’t necessary.
It’s also unnecessary when you intentionally want to achieve a different texture. For example, in some soups, stews, or vegetable sautés, the ingredients can go through the entire cooking process without any pre-treatment.
In other words, blanching isn’t a mandatory ritual, but a useful tool. It should be used when it actually improves the result.
Top recipes that use blanching
Below are a few good examples where this technique is truly appropriate.
1. Peeled tomatoes for the sauce
One of the most practical options. Blanch the tomatoes for 20–40 seconds, let them cool, peel them, and then use them to make homemade tomato sauce, soup, or a pasta sauce.
This method results in a smoother texture and a cleaner flavor. The sauce turns out more uniform and more pleasant.
2. Broccoli for a warm salad
Blanch the broccoli briefly until it turns bright green, let it cool, and then add it to a salad with eggs, cheese, nuts, or a yogurt dressing.
As a result, the broccoli stays juicy and crisp, rather than raw or overcooked. This is one of the best ways to serve broccoli at home.
3. Green beans with butter and garlic
After blanching, the beans can be quickly sautéed in butter or olive oil with garlic. The result is a simple yet very flavorful side dish.
Blanching reduces the time needed to cook them in the pan and helps preserve their vibrant green color.
4. Spinach for the filling
If you’re preparing a filling for a pie, pancakes, quiche, or casserole, it’s best to quickly blanch the spinach, let it cool, and squeeze out the excess water thoroughly.
This will make it more compact, remove excess moisture, and prevent the dish from becoming watery.
5. Blanched almonds for desserts
This is a classic kitchen task. Pour boiling water over the almonds or blanch them briefly, after which the skins can be easily removed with your fingers.
These almonds are perfect for creams, dough, decorations, marzipan, and homemade candies.
6. Vegetables for freezing
Broccoli, peas, corn, cauliflower, and green beans keep much better in the freezer after blanching. This isn’t just a single recipe, but a whole practical approach to seasonal cooking.
Because
- Always have a bowl of ice ready before you start.
- Work in small batches.
- Use a timer instead of just saying, “I think that’s enough.”
- Cut the product into uniform pieces.
- Be sure to dry them thoroughly before cooking.
- If in doubt, it’s better to undercook than to overcook.
- When blanching bright green vegetables, do not cover the pot with a lid during the active blanching phase.
- If the vegetable is going to be cooked in the oven or in a pan, reduce the prep time.
Frequently Asked Questions
Are blanching and boiling the same thing?
No. Boiling cooks the food until it’s done, while blanching only briefly prepares it for the next step.
Why put the food in ice water?
To stop the cooking process immediately and prevent the food from overcooking.
Can you blanch without ice?
You can cool them in very cold water, but ice provides much better control, especially for leafy greens.
Which foods are most commonly blanched?
Broccoli, spinach, green beans, peas, asparagus, tomatoes, peaches, almonds, and sometimes bones and offal.
Should you blanch vegetables before freezing them?
In most cases, yes, especially if you want to preserve their color, flavor, and texture after thawing.
How long should you blanch tomatoes?
Usually 20–40 seconds, depending on their size and firmness.
Why does broccoli sometimes turn dull after blanching?
The most common reason is that it’s been in the water too long or hasn’t been cooled quickly enough.
Can you blanch potatoes?
Yes, especially before frying, baking, or freezing french fries.