
Khinkali is a traditional Georgian dish in the form of dumplings made from simple dough, filled with minced meat and spicy broth. It is not just a dish, but a real cultural identity of the Georgian people, a symbol of hospitality and Caucasian hospitality that unites the whole family around one table.
Content
What is khinkali and what makes them special.
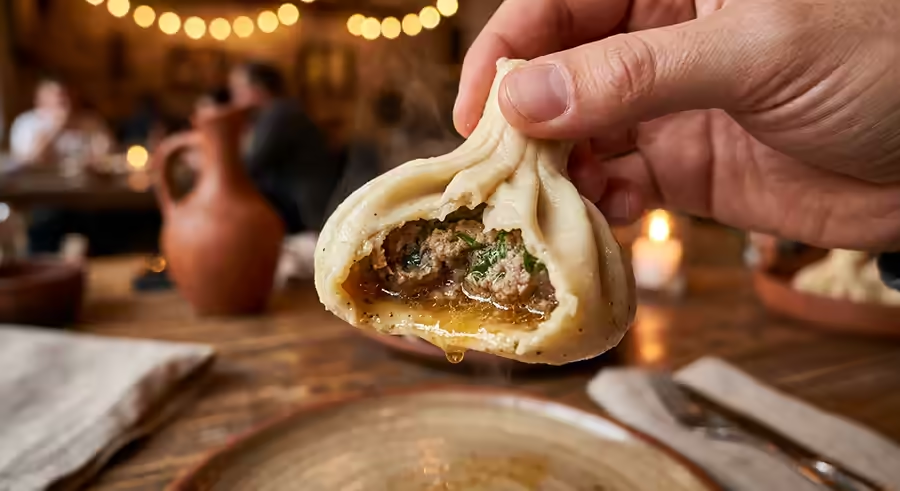
At first glance, khinkali may appear similar to pelmeni or vareniki. But this is just a superficial impression – this dish is absolutely unique in the world culinary calendar. The main difference lies in the fact that traditionally, a correctly shaped dumpling is served during the serving time contains a large amount of aromatic broth. This spicy broth is a key component of the dish – it is important to preserve it after the first bite.
Another distinctive principle is the way of eating. Khinkali are eaten exclusively by hand, holding by the top, and no plate is served here. This is not just a tradition – it is a testimony of personal attachment to eating, where each dumpling is a ritual. The size of the dish can also vary from pelmeni: one khinkali weighs from 50 to 80 grams, so the typical portion consists of only 3-5 pieces.
Traditionally prepared dumpling should be firmly sealed and have at least 28 folds – this is considered the standard in Georgia. The mastery of the chef is measured not only by the taste, but also by the quantity and uniformity of these folds.
Comparison of khinkali and pelmeni
Many people consider these dishes similar, but they have distinct culinary characteristics.
| Characteristic | khinkali | Pelmeni |
|---|---|---|
| Form | Dumpling with folds and broth | A novice or beginner chef |
| Start | Rube meat with a large amount of fat | Thick fish without bony parts |
| Method of cooking | Excluded with hands through a sieve | With spoon or ladle |
| Sauces | Only black pepper | Smoked, ketchup, mayonnaise |
| Size | Large, 3-5 pieces per serving | Small, big platter |
| Dough wrap | Plain without eggs (classic) | With eggs, richer |
| Internal filling | With mandatory inclusion | Absent |
Short history of the dish
With its origins from the khinkali, associated with the residents of the mountainous regions of Georgia. This dish appeared in the mountains of Tusheti, Khevsureti, and Pshavi — areas where the climate is extremely harsh, and the food must be nutritional and long-lasting. Initially, they prepared it exclusively from barley or eggs, which were finely chopped into small pieces before being mixed into a kitchen pot — none of the meat or dumplings existed.
The release in the division of the dish reached the places where it progressively transformed and enriched with new spices. Mountain residents began to add in the beginnings potatoes, herbs, and various seasonings. Over time, hinkali became an inseparable part of the Georgian culture, and their preparation turned into a whole family affair, where a considerable number of family members take part in shaping the amounts of dumplings.
Today, this dish has gained popularity far beyond the borders of the Caucasus. It is present on the menu of Georgian restaurants worldwide and continues to attract thousands of tourists who travel to Tbilisi and mountainous villages especially in search of authentic taste.
Regional varieties of khinkali
Even in Georgia, the dish is not uniform — each region has its own unique variation of preparation:
- Kalakuri (city) — the most common variant, made with meat and fresh herbs
- Mtiuluri (mountain) — a classic version without greens, only meat and pepper
- Khevsurlu — made with yellow peas and a large amount of onion
- Racha — a version with mushrooms or a combination of pork and chicken
- Tushuri — very thick variant with mountain herbs and chili pepper
Classic hünkâr beğendi recipe
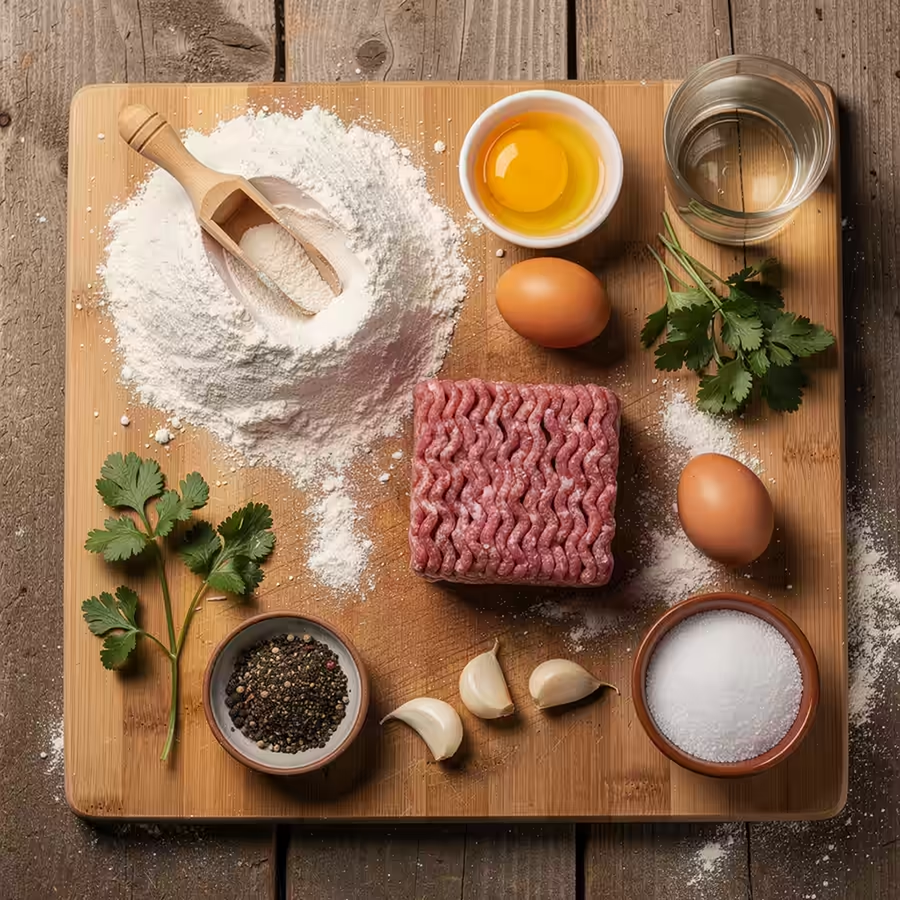
Ingredients for the paste (for 20-25 pieces)
- Borosilicate wheat flour — 500 g
- Cold water — 200-250 ml
- Salt — 1 teaspoon
- Chicken egg — 1 piece (to taste)
- Vegetable oil — 1 tablespoon
Ingredients for the sauce
- Lamb — 300 g
- Pork (fatty) — 200 g
- Onion — 2-3 pieces
- Garlic — 3-4 cloves
- Cold water or broth — 200-250 ml
- Salt — 1 teaspoon
- Ground black pepper — 1 teaspoon
- Hop-suneli — 1 teaspoon
- Ground coriander — 0.5 teaspoon
- Fresh thyme — 1 bunch (to taste)
- Parsley — a handful
Preparing the paste: detailed step by step
Step 1: Sifting the flour
The flour needs to be sifted through a fine sieve initially. This helps to loosen it, removes lumps, and makes the future paste lighter and easier to work with. Sifting the flour introduces air into it, creating a lighter texture to the final dish.
Step 2: Mixing
In the center of the flour, create a well and gradually add cold water. It is very important to use cold water — it prevents gluten development and makes the dough softer and more malleable. Mix the flour with the water using a spatula, combining the flour from the edges to the center, then switch to manual mixing.
Step 3: Kneading the dough
Dough for hünkâr beğendi should knead significantly longer than usual — about 10-15 minutes without a break. The finished mass should be smooth, homogeneous, and absolutely not sticky to the hands or surface. If the dough still sticks, add a little more sifted flour.
Step 4: Resting in the cold
The prepared dough should be covered with a kitchen towel or wrapped in a damp cloth. It is sent to the refrigerator for at least 30 minutes, ideally for 1 hour. During this time, the gluten develops, and the dough becomes exceptionally elastic and easy to roll out. This step is categorically essential, especially since it directly affects whether the dough will tear during shaping.
Step 5: Rolling Out
Divide the dough into several pieces and roll each out to a thickness of about 2-3 mm. The thin base will not retain the weight of the liquid filling, while the thicker one will likely be an improper dough for this purpose. Using a round cutter or a regular glass, cut out circles with a diameter of 10-15 cm.
Preparation of the Filling: The Secret of Juiciness
Properly minced meat
Traditionally, for producing dumplings, meat should not be minced through a meat grinder, but sliced with a sharp knife. This is very important: through the meat grinder, the fibers break and the meat becomes sticky, releasing a liquid that causes it to lose its original texture. When cutting with a knife, the fiber structure is preserved, and the filling remains juicy. If there is little time, it is permissible to use minced meat with the largest holes.
The Secret of Adding Fat
The main secret of a juicy filling is the gradual introduction of cold water or broth into the meat. Start with 150 ml and continue adding the mass via a spoon or hands until it absorbs the filling. Then add another 50-100 ml and blend again. The finished filling should retain its shape — almost like a thick paste, but it must conserve form. The specific quantity of water during the preparation turns into the same broth.
Chives and Spices
Chives and spices should be finely chopped with a knife or crushed through a meat grinder separately from the meat. Chives play a key role — they add flavor and release liquid, enriching the filling with additional moisture. Some cooks have previously blended the chives with a knife from celery to produce more aroma.
Balance of Flavors
Khmeli-suneli — this is the main Georgian seasoning for this dish, without which it is impossible to achieve an authentic taste. It consists of more than ten different herbs and spices: coriander, parsley, marjoram, saffron, basil, and others. Black pepper adds a hint — Georgian cuisine loves spicy flavor.
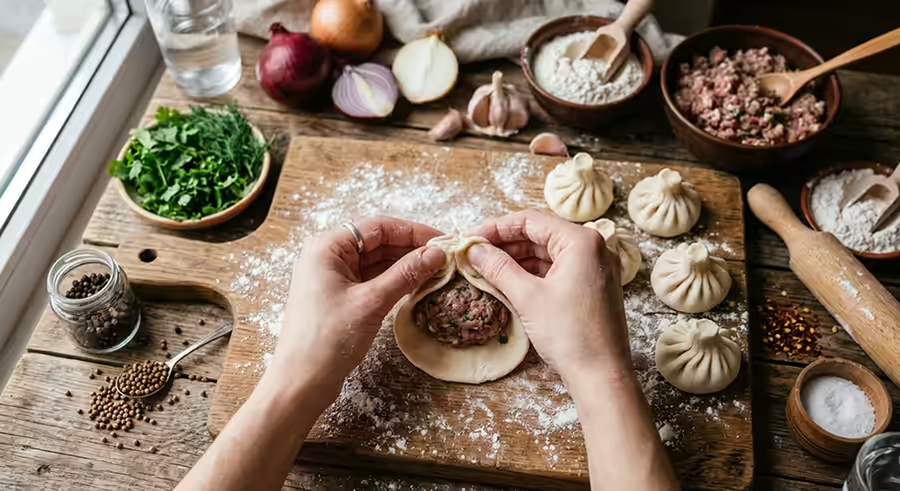
Preparation technique for hinks.
Preparation of the workspace.
Before applying the paste, roll out a thin layer of dough, sprinkle with flour, prepare the filling, and cut out round circles of the dough. Place the mixture from the saucepan in order. It is important to manipulate quickly so that the dough does not lose its height.
Application of the filling.
In the center of each circle, place about 1.5-2 tablespoons of the filling. Larger portions do not make sense — in case of excess filling, the edges of the dough will be difficult to seal, and they might tear during cooking.
Forming the dumplings.
The edges of the dough are pinched together with big and pointed fingers and pressed with small pinch grips, working along the line. Each new dumpling overlaps the previous one — this creates a beautiful wave pattern. The movement is done in one direction — with a pinching stroke or counter, depending on the habits. The ideal quantity is 28 dumplings, but even 18-20 is considered a normal result for beginners.
Sealing the dumpling.
After forming all the dumplings, the tops must be twisted and left to slightly rise. The dough should be tight and still sealed — any gap can allow steam to escape during cooking. The finished dumplings should be nice and smooth, without holes, to ensure hermeticity.
Correct cooking.
Preparation of the saucepan.
Take a large saucepan and fill it with water — not less than 3-4 liters. The water should be good quality: it should have sufficient salinity for the taste. Bring to a strong boil.
How to release the dumplings.
Dumplings release one at a time, holding onto the dumpling and accurately lowering it into the boiling water. After releasing the blue print, cover the saucepan with a wooden lid to ensure it doesn’t stick to the bottom. This procedure is repeated a few times during the first waves of boiling.
Cooking time.
After frying, let the dumplings rest on the surface for another 7-10 minutes. The total time may vary based on the size of the products and their filling, but generally it should take around 12-15 minutes from the moment they are removed. Check readiness as follows: the dumplings should appear golden, have a crispy texture on the outside, and the filling should be hearty.
Frying time varies
- You cannot fry in a coated pan – only use a non-stick pan.
- You cannot fry in a small amount of water – it should not be soggy.
- You cannot place too much dough at once – the water will stop boiling.
- You cannot fry in a small amount of oil – the dough will absorb more than usual, rather than being browned.
Ways to serve dishes
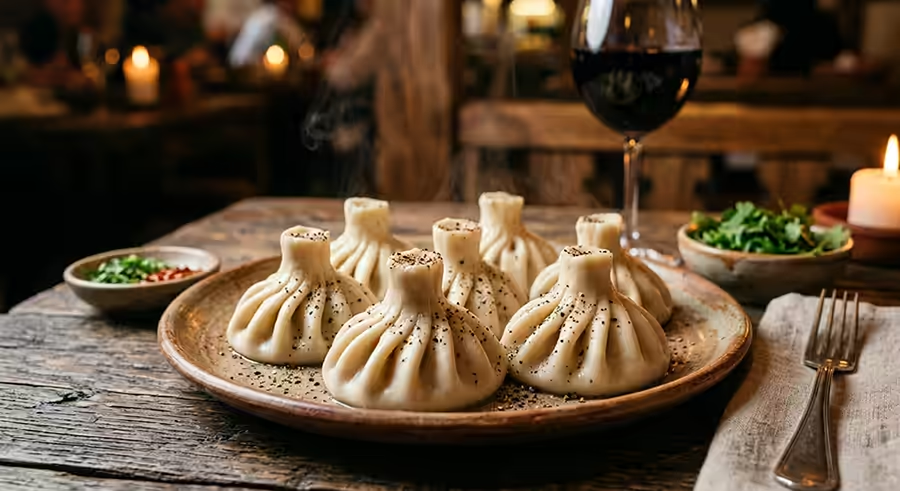
Serve the dumplings in a large plate in one layer. On top, sprinkle with freshly ground black pepper. Serve immediately – the dish should be served hot so that it doesn’t lose its shape.
Traditional Russian serving does not involve any sauces, decorations, or garnishes. However, in modern restaurants, dumplings are often served with a dollop of sour cream, a wedge of lemon, or a small bowl of vinegar for those who enjoy spicy sauces.
The rules of etiquette dictate: Russian etiquette
Technique of serving
Dumplings are taken with a large spoon and indicated by one big piece. The filling should be slightly turned, holding with a spoon in one hand, and do not let the small pieces fall off. The first bite should always be hot so as to not burn the lips. Only after this can you take the dumpling with your hands.
Why you can’t eat with a fork
The top knot of dough is not eaten because of several reasons. First, a lot of layers of uncooked dough are gathered there, which remains raw and hard after cooking. Second, according to the old tradition, the remaining dough pieces served their original purpose – the dumplings were calculated based on how many pieces each guest had. The host of the table always ensures that nobody ends up with little.
Unacceptable actions
- Cutting dumplings with a knife – it should always be served whole on a plate.
- Eating with chopsticks – is considered an ignorant misunderstanding of tradition.
- Leaving the dumpling whole – is the most essential part of the dish.
- Rice with sauce — concludes an authentic taste
With what do they combine and serve the khinkali
Traditional complements
The dish itself is a complete entity — it pairs perfectly with mints and others. Classic complements to it are minimal:
- Freshly ground black pepper — is the only necessary spice
- Clarified butter — for enhancing the taste
- Spicy sauce with herbs — for lovers of a piquant flavor
- Fresh greens (cilantro, parsley) — only for decoration
Ideal for a topping
The right choice of sauce complements the hinkali flavor gaps:
- Cold light beer — the most popular pairing in Georgia
- Chacha (grape brandy) — a traditional alternative for unique occasions
- Homemade red dry wine — a classic of Caucasian cuisine
- Limonade “Lagidze” — a Georgian non-alcoholic version
- Mineral water Borjomi — complements the taste after eating it
What to serve as a side
khinkali are part of a large Georgian table, to them wonderfully fit:
- Fresh vegetable salads with tomatoes and cucumbers
- Georgian bread shot or matzoni (corn bread)
- Pickled vegetables (ginger, garlic)
- Green salads with cilantro and garlic dressing
All popular variants begin
Meat classic
Sumysh of yellow (60%) and pork (40%) with onion, garlic and hops. This proportion gives an ideal balance of lean and fatty meat. The yellowish gives a delicious taste, while the pork adds richness.
khinkali with baranina
The oldest and most aromatic option from mountainous regions. Baranina offers a unique Caucasian aroma and a very delicate taste. To it necessarily add coriander, grains and a good amount of fresh cilantro.
khinkali with suluguni cheese
A beloved vegetarian option, popular throughout Georgia. The net suluguni mixed with fresh greens and garlic. Under the influence of temperature the cheese melts, creating a creamy mass.
khinkali with mushrooms
They start with finely chopped fresh or dried mushrooms, accompanied by onions. For the upper texture, add a spoonful of cream or homemade cheese. Ideal options include white mushrooms, chanterelles, or forest mushrooms.
Chickpeas with cardamom
An economical and very filling option, popular in mountain villages. Prepared chickpeas are served with puree and sometimes accompanied by sour cream, black pepper, and dill. The dish works wonderfully as a children’s menu item.
Chickpeas with fish
Less well-known but a very gourmet option. Salmon, perch, or pike are used with additions of chickpea puree, lemon sauce, and fresh herbs. Fish chickpeas are usually made thicker than meat.
Chickpeas with shrimp
A contemporary restaurant version of chickpeas with finely chopped shrimp, garlic, greens, and basil. This variant gained popularity in large cities such as fusion-version of a classic dish.
Caloric content and nutritional value
The indicators depend, for example, on the initial stock and fat content of the meat:
| Type | Caloric content (100 g) | Proteins | Fats |
|---|---|---|---|
| Meat classics | 220-250 kcal | 12-14 g | 10-12 g |
| With barley | 230-260 kcal | 11-13 g | 12-14 g |
| Cheese (suluguni) | 240 kcal | 10-12 g | 13-15 g |
| Mushrooms | 160 kcal | 6-8 g | 5-7 g |
| Cardamom | 180 kcal | 4-6 g | 4-6 g |
Most common pomace
Pomace with dough
- Usually liquid dough — chickpeas rupture during the cooking process
- Do not let the dough rest — it will become dry and unworkable
- Usually, slightly cracked dough — the dough does not maintain liquid content
- Do not overlook — the mass will rise unevenly with pockets
Pomace with a starter
- Dry fish without family — it will remain devoid
- Pass the meat through a fine sieve — the fish will clump together
- Small spices — a dish will come out straightforward and non-technical
- Usually, large amounts of starter — mixtures will fall apart or stick together
Pomace with red
- Little water in the saucepan — the product will stick together
- Weak smoke — this is the description used for earlier times
- Smoked with a hint of — a slight hint of taste will appear
- To marinate — the meat is typically juicy inside
Useful tips from chefs
Experienced chefs always recommend preparing the meat in advance — it can be stored in the refrigerator for up to 24 hours, making it more flavorful. It’s better to cut the fish with a knife twice — first into larger pieces, and then into smaller ones. When adding water to the fish, it’s necessary to add small portions, each time carefully mixing.
If a piece of meat is too tough, it needs to be actively tenderized — cut with a height of 10-15 centimeters, stretching for 2-3 minutes. This method helps the meat absorb more flavor.
FAQ: Answers to Frequently Asked Questions
How long can marinated herring be stored?
Marinated products do not need to be thawed. They are usually released straight into the pot and should be cooked for 12-15 minutes after reheating.
Why do herring get stuck together?
Because of the small amount of water in the pot or improper layering. To avoid this, they are taken out of the water immediately after removal.
Is sauce necessary?
The traditional recipe does not include mayonnaise or ketchup. The inner layer contains naturally occurring sauce, while additional flavor is provided by black pepper.
How to store prepared herring?
In the refrigerator for up to 24 hours. Before reheating, they should be placed again for 2-3 minutes, or be wrapped in a cloth to retain their tenderness.
How many layers of cake should there be?
The classic standard is 28 layers. However, even 18-20 are considered acceptable for home cooking.
Can you substitute cheese?
Yes, for those who do not like the specific flavor of cheese, feta or green cheese will work. The strong variant will generally occur without any particular greens.
How to freeze takeout meals?
They fully merge on the surface, forming a layer of transparency in the lower part, while the rest appears more solid and opaque.
Can you prepare takeout meals for two?
Yes, it’s less common, but entirely permissible. The prepared meals for two tend to have a lower thickness and retain more juice inside.
What meat is better to use?
Classic – a mixture of poultry and pork in a ratio of 60/40. The most flavorful takeout meals come from meat with minimal fat content – it provides juiciness.
Can takeout meals be prepared in advance?
They can be stored tightly packed in one layer in the freezer, and then transferred to a bag. They last in the freezer for up to 3 months without losing flavor.