
The history and legend of an Italian dish
Content
Arancini (Italian for “little oranges”) is one of the most recognizable dishes of Italian cuisine, originating directly from sunny Sicily. These deep-fried rice balls, 8–10 centimeters in diameter, have a characteristic golden-orange color, which gave them their name. Arancini are stuffed with a variety of ingredients, from classic meat and mozzarella to mushrooms, vegetables, and even seafood.
The name of the dish has an interesting etymology. The word comes from the Italian word arancia, which means orange. This choice is explained not only by the rich golden-orange color that the balls take on after frying in hot oil, but also by their round shape, reminiscent of an orange. In Sicily, there is even a regional difference in the name: western Sicilians (Palermitans) call this dish arancina (singular), while eastern Sicilians call it arancini (plural).
History of origin
The history of arancini dates back to ancient times. The most common theory is that this dish was invented in the 10th century during the Calabid reign in Sicily. At that time, the Arabs who ruled the island brought with them a love of rice dishes seasoned with saffron and other oriental spices. It was then that the first rice dishes appeared in Mediterranean cuisine, which later transformed into the arancini we know today.
However, the modern version of arancini took shape in the 13th century during the reign of King Federico II. An incredible detail: the king ordered rice balls coated in breadcrumbs to be prepared especially for his hunting expeditions. The breaded outer shell ensured that the filling and rice were perfectly preserved during travel, and it was also convenient to transport. Thus, arancini became one of the first dishes that can be called the ancestor of modern “fast food” or takeaway food.
Over time, arancini shed their status as “royal expedition food” and became a favorite snack for all segments of Sicilian society. Today, this dish remains a symbol of Sicilian hospitality and culinary tradition.
Interesting fact: every year on December 13, Sicily celebrates Saint Lucy’s Day (Festa di Santa Lucia). According to tradition, it is not customary to eat flour dishes on this day, so instead of bread and pasta, Sicilians’ tables are filled with arancini of all types, shapes, and sizes. This day turns into a real festival, when the streets of Palermo and other Sicilian cities are filled with kiosks and carts selling hot arancini.
What’s in the classic arancini recipe?
Since arancini is a dish with a long tradition, there is a basic formula on which all variations of this dish are based. Let’s take a closer look at the ingredients needed to make classic arancini.
Main components
Rice for arancini: the most important ingredient. To make authentic arancini, it is recommended to use Italian varieties of round or medium-grain rice, such as Arborio, Carnaroli, or Vialone Nano. These varieties are characterized by a high starch content, which provides the desired structure and stickiness when forming balls. Be sure to use these varieties, rather than long-grain basmati rice or long-grain white rice.
Saffron: the main spice that gives arancini its characteristic golden yellow color and delicate spicy note. Saffron is an expensive spice, but it is what makes arancini authentic. For 250 grams of rice, you need at least 0.5 grams of saffron, which is equivalent to 10-15 threads.
Butter: provides a rich and delicate flavor. Butter is added both to the rice during cooking and when mixing the finished rice before cooling.
Broth: Chicken broth is traditionally used, although some cooks substitute vegetable broth. The broth should be warm when added to the rice to ensure even cooking.
Protein wine: often added when cooking risotto for acidity and refined taste. A dry white wine such as Pinot Grigio is good.
Egg: One egg yolk or a whole egg is added to the cooked, cooled rice to bind the ingredients together. Some recipes also call for egg white to be used for coating.
Cheese: traditionally hard cheese (Parmesan or similar) finely grated. For 250 grams of rice, use 50-100 grams of cheese.
Fillings for arancini
Meat sauce (ragù alla bolognese): the most popular variation in southern Italy. It is made from minced meat, onions, carrots, celery, and tomato paste, simmered over low heat until it becomes smooth and thick. The minced meat should be dense, without any liquid ingredients.
Mozzarella: Fresh mozzarella is most commonly used, cut into 1.5-2 cm cubes. Some chefs add green onions or parsley to the mozzarella.
Vegetable and pea garnish: a classic accompaniment consisting of frozen green peas, pieces of celery root and carrots mixed with ragout.
Ingredients for breading and frying
Breadcrumbs: high-quality breadcrumbs create a crispy golden outer layer. You can use either store-bought breadcrumbs or homemade ones (dried and crushed bread crusts).
Flour: First-grade wheat flour is used as the first layer before the egg. It helps the egg stick better.
Eggs: Beat two or three eggs with a little salt. The egg acts as a “glue” between the flour and breadcrumbs.
Frying oil: you need a neutral oil with a high smoke point — sunflower, corn, or peanut oil. Olive oil is not suitable for deep frying due to its low smoke point. The oil should be hot enough (around 175–180 °C) when adding the balls.
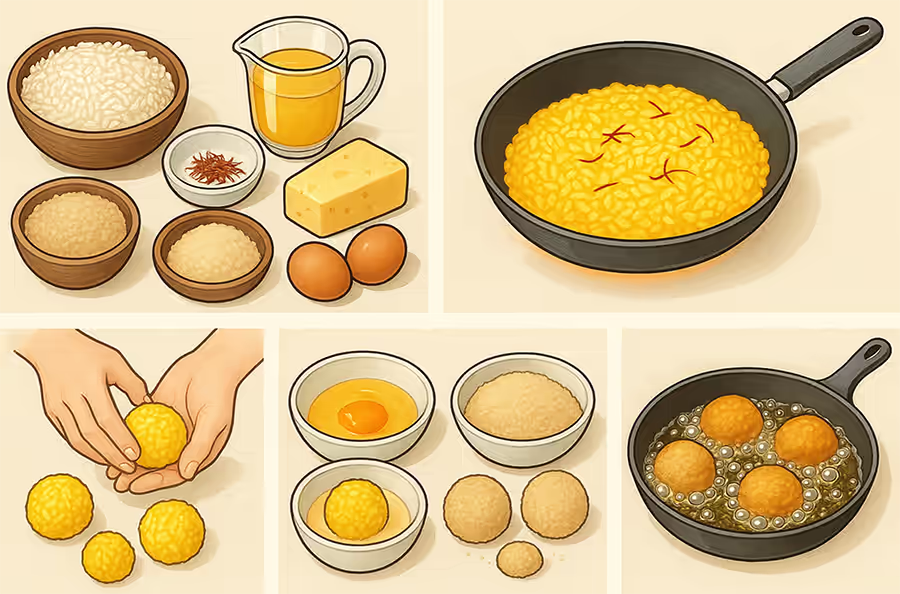
Detailed recipe for arancini with meat and cheese
Step 1: Preparing classic risotto with saffron
Ingredients for risotto:
- 250 grams of Arborio rice
- 700 milliliters of chicken broth
- 115 milliliters of dry white wine
- 50 grams of butter
- 50 grams of hard cheese (Parmesan), finely grated
- 10-15 strands of saffron (about 0.5 grams)
- 1 egg yolk
- 2 tablespoons olive oil
- Salt and freshly ground black pepper to taste
Instructions:
- First, brew the saffron. Pour 2-3 tablespoons of hot (but not boiling) broth into a small cup, add the saffron threads, and leave to soak for 10-15 minutes. This will activate the pigments and aromatic compounds in the saffron.
- Heat a large saucepan or large pot with a thick bottom over medium heat. Add the olive oil and 25 grams of butter. When the butter has melted and the oil is hot, add the rice. Stir constantly for 1-2 minutes until the rice grains become transparent at the edges but remain firm in the center. This process is called “toasting” the rice.
- Pour the white wine into the rice and stir until the rice has absorbed almost all of the liquid. This will take about 1-2 minutes.
- Now start gradually adding warm broth. Add about 150-200 milliliters at a time, wait until the rice absorbs the liquid before adding the next portion. This process will take about 15-18 minutes. Stir constantly so that the rice cooks evenly and does not stick to the bottom.
- 2-3 minutes before the end of cooking, add the brewed saffron mixture to the rice. Stir gently.
- When the rice is soft but still slightly firm in the center (a state commonly referred to as al dente), remove the pot from the heat. Add the remaining butter (25 grams), grated cheese, egg yolk, salt, and pepper. Stir vigorously for a few seconds — this process is called mantecatura and creates a creamy texture.
- Spread the hot risotto onto a large baking sheet lined with parchment paper in a thin layer (about 1-1.5 centimeters). Cool to room temperature, then refrigerate for at least 2-3 hours, preferably overnight. Chilled rice is much easier to shape into balls.
Step 2: Preparing the meat filling (ragout)
Ingredients:
- 200 grams of ground meat (beef or mixed meat)
- 1 medium onion
- 1 small carrot
- 2 tablespoons tomato paste
- 100 milliliters of red wine
- 200 milliliters of vegetable or meat broth
- 2 tablespoons olive oil
- 1 clove of garlic
- Salt, black pepper, dried paprika to taste
- Fresh parsley or basil (optional)
Instructions:
- Finely chop the onion, carrot, and garlic.
- Heat the olive oil in a large skillet or saucepan over medium-high heat. Add the chopped onion, carrots, and garlic. Sauté for about 5 minutes, until the vegetables are soft and slightly caramelized.
- Add the ground meat to the same pan. Break it up into small pieces with a wooden spoon or spatula. Fry over medium-high heat for 5-7 minutes, until the meat loses its red color and begins to brown.
- Add the tomato paste. Stir for 1 minute to mix the paste with the meat and vegetables and fry slightly.
- Pour in the red wine and let it evaporate for 2-3 minutes to remove the harsh alcohol notes.
- Add the broth, salt, pepper, and paprika. Reduce the heat to low and simmer the stew uncovered for 30-40 minutes. The stew should become very thick, without excess liquid. If the stew is still moist at the end of cooking, increase the heat and continue cooking until most of the liquid has evaporated.
- Transfer the finished stew to a plate to cool. Once it has cooled completely, the stew can also be placed in the refrigerator for 30-60 minutes.
Step 3: Forming the arancini
Ingredients for shaping:
- 150 grams of mozzarella (cut into 1.5-2 cm cubes)
- Chilled risotto
- Chilled stew
- A piece of extra cheese (optional)
Instructions:
- Now comes the most skillful and creative part of the process. With wet hands (wet them with cold water—this prevents stickiness), take about 50 grams of cooled risotto. It should be about the size of a large egg or a small onion.
- Place the risotto in the palm of your left hand (if you are right-handed) and flatten it into a disc-shaped patty about 1 centimeter thick.
- Place a small spoonful of cooled ragout (about 1 tablespoon), mozzarella crumbs, and, if desired, a small amount of additional grated cheese in the center of the flatbread.
- Gradually folding the edges of the flatbread toward the center, wrap the filling with rice, forming a rice ball. Make sure that the ragout and mozzarella are completely covered with rice, otherwise they will leak out during frying. The shape can be perfectly round, slightly oval, or cone-shaped — it depends on personal preference and regional traditions.
- Place the formed arancini on a baking sheet lined with parchment paper. Repeat the process with the remaining risotto until all ingredients are used up. This usually makes 8-12 arancini, depending on the size of the balls.
- The formed arancini can be used immediately or refrigerated for up to 2-3 hours. For long-term storage, you can freeze them on a baking sheet in the freezer and then transfer them to an airtight container, where they will keep for up to 3 months.
Step 4: Breading the arancini
Ingredients:
- 100 grams of wheat flour
- 3 eggs
- 150 grams of breadcrumbs
- Salt and black pepper to taste
Instructions:
- Prepare three separate bowls or deep plates. Pour the wheat flour mixed with a pinch of salt and pepper into the first one. Break the eggs into the second one, add a pinch of salt, and beat vigorously with a fork or wire whisk. Pour the breadcrumbs into the third one.
- First, roll the formed cooled arancina in flour, removing any excess. The flour creates a base to which the egg will stick.
- Immediately dip the arancina in the egg, turning it on all sides so that it is completely coated with the beaten egg.
- Now dip the egg-coated arancina in the breadcrumbs. Coat it thoroughly, making sure that the entire outer layer is covered with breadcrumbs. You can press the breadcrumbs lightly into the surface to help them stick better.
- Place the breaded arancini on a baking sheet. Repeat the breading process for all the balls you have formed. Breaded arancini can be stored in the refrigerator for up to 1 hour before frying, or you can proceed to frying immediately.
Step 5: Frying the arancini
Ingredients:
- 1 liter of neutral oil for frying (sunflower, corn, or peanut)
Instructions:
- Heat the oil in a deep saucepan or deep fryer to 175–180 °C. The correct temperature is critical — oil that is too cold will result in greasy, soggy arancini, while oil that is too hot will fry them on the outside, leaving the center undercooked.
- To check the temperature without a thermometer, dip a small piece of bread into the hot oil. If it turns golden brown in 60 seconds, the temperature is optimal.
- Carefully lower 3-4 breaded arancini into the hot oil. Do not add too many at once, as this will lower the oil temperature and result in greasy results. The arancini should have room to move around in the oil.
- Fry them for 2-3 minutes until they are golden brown on all sides. They will sink in the oil at first, but will eventually float. Tie them with string to ensure even frying.
- Using a slotted spoon or slotted spatula, carefully remove the golden arancini from the oil. Place them on disposable or cloth napkins to remove excess oil.
- Repeat frying for the remaining arancini, checking the oil temperature before each batch.
- Serve the arancini immediately. They are most delicious when still warm, with the cheese in the center melted and stringy.
Popular variations of arancini in Sicily and beyond
Although the classic recipe has remained unchanged for centuries, each region of Sicily has developed its own unique interpretation of arancini. In addition, chefs and home cooks have invented new, often experimental variations over time.
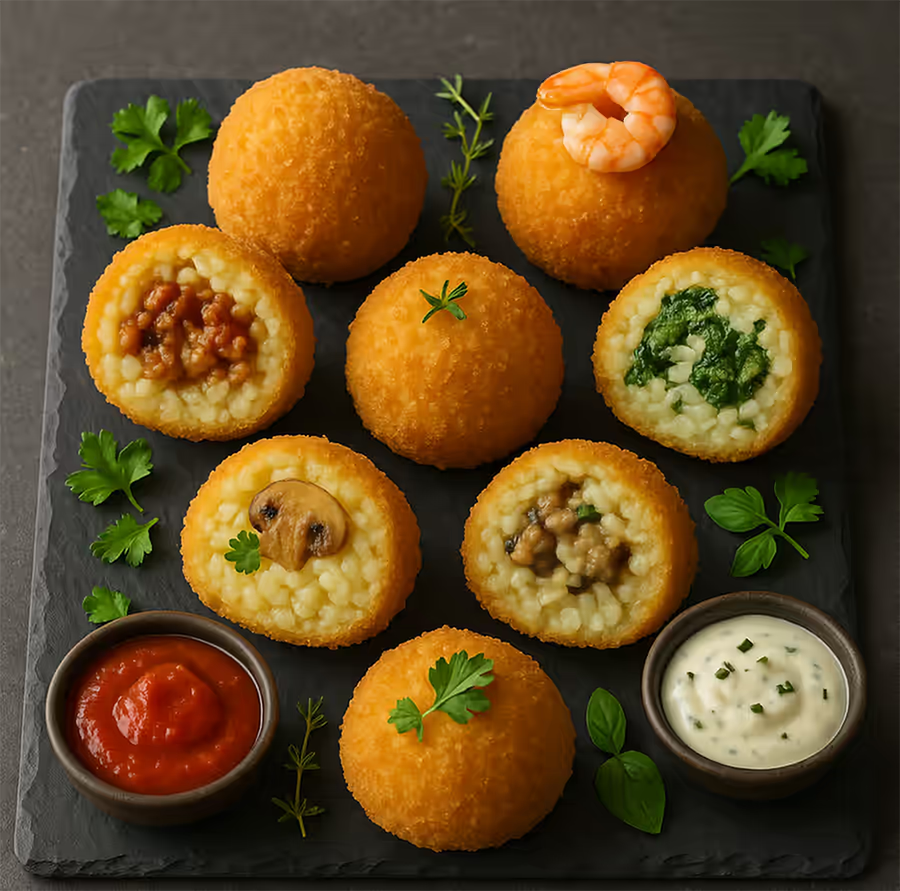
Arancini with mozzarella and tomatoes (Arancini al Ragù e Mozzarella)
This is a classic variation, where instead of meat, fresh mozzarella and a small amount of dried tomato, concentrated tomato sauce, or simple tomato sauce are placed in the center of the ball. It is less meaty and lighter than the original version, but much more popular in modern cuisine.
Variation: Some cooks add chopped green onions, fresh parsley, and basil to the filling for a fresher taste.
Arancini with mushrooms (Arancini ai Funghi)
In this variation, the classic meat ragout is replaced with a ragout made from fresh mushrooms. Champignons, white mushrooms, or a mixture of mushrooms are finely chopped, fried with onions and garlic, and then simmered in tomato sauce and broth. This variation is popular among vegetarians and mushroom lovers. Honey is often added to this filling to balance the flavor.
Arancini with fish and seafood (Arancini di Pesce)
On the coast of Sicily, a variation with shrimp, squid, or other white fish filling is popular. Minced meat is replaced with chopped seafood mixed with onions, tomato sauce, and sometimes lemon juice and fresh parsley.
Arancini with spinach and ricotta (Arancini Spinaci e Ricotta)
This variation is popular in eastern Sicily. Fresh or frozen spinach is blanched, finely chopped, and mixed with creamy ricotta, grated cheese, and sometimes a small amount of nutmeg. This filling is more delicate and creamy than the traditional meat filling.
Arancini with Gorgonzola (Arancini di Gorgonzola)
In this delicious variation, classic mozzarella is replaced with blue Gorgonzola cheese. They are often topped with a small amount of walnuts for contrast. This variation has a more refined, cheesy taste and is recommended for those who enjoy strong cheese flavors.
Arancini with ham and pistachios (Arancini Prosciutto e Pistacchio)
In western Sicily, especially in Palermo, a variation with sliced prosciutto and chopped pistachios is popular. Pistachios are easily recognizable with their greenish color and distinctive flavor. These arancini are often served as a luxurious appetizer at festive receptions.
Sweet arancini (Arancini Dolci)
On Saint Lucy’s Day, sweet arancini are traditionally prepared. The risotto is made with less cheese and saffron, and sugar and vanilla are added to the rice instead. The filling consists of warm hot chocolate, custard, chopped nuts, dried fruit, and sometimes apples or pears. The finished arancini are served hot, sprinkled with sugar and cocoa powder.
Practical tips for perfect arancini
Choosing rice and preparing it
Let us emphasize once again: the quality of rice is critically important. Italian round-grain varieties (Arborio, Carnaroli, Vialone Nano) have a higher starch content, which ensures a sticky, uniform consistency of risotto. This makes it easy to form balls without them falling apart.
If you cannot find Italian rice, an alternative is Japanese sushi rice. However, do not use long-grain rice (basmati, jasmine) or wild rice, as they do not contain enough starch.
Cooling risotto
This is one of the most important steps. Warm risotto cannot be shaped—it will crumble or spread. After cooling for several hours (preferably overnight), the risotto will have the right consistency for shaping. If you don’t have time, put the risotto in the freezer for 15-20 minutes, but make sure it doesn’t freeze completely.
Preparation of the filling
Aim for insufficient filling. Too much stew and cheese will cause leakage during frying. Moreover, when you bake rice, if the surface is not dense enough, hot oil will penetrate inside and the filling will leak out. Literally 1-1.5 tablespoons of stew and a few cubes of mozzarella per ball is just right.
Breading
Three-step breading (flour → egg → breadcrumbs) is critical. Some cooks double bread — repeating the egg → breadcrumbs cycle a second time — for a crispier outer layer. However, this is not necessary.
Use high-quality breadcrumbs. If possible, make them yourself from dried bread. Homemade breadcrumbs create a more pleasant coating and a more pleasant texture than industrial ones.
Oil temperature control
This point is absolutely critical. Oil that is too cold (below 170 °C) will cause the arancini to absorb too much oil, and they will be greasy and raw inside. Oil that is too hot (above 185 °C) will brown the outer layer but will not allow the heat to penetrate inside.
Invest in a good cooking thermometer. This is the most straightforward way to get consistent results. If you don’t have a thermometer, use the traditional method with a piece of bread — it should turn golden brown in 60 seconds.
Frying: batches and experiences
Do not add too many arancini at once. Each arancini takes up a certain amount of space in the oil, and the temperature will drop sharply if you add too many. Ideally, add 3-4 arancini at a time. After each batch, allow the oil 30-60 seconds to return to the desired temperature.
An alternative to frying: baking
If you want a lighter version, you can bake the arancini in the oven instead of frying them. Place the breaded arancini on a baking sheet lined with parchment paper, brush them lightly with olive oil spray or a cooking brush, and then bake at 200°C for 15-20 minutes, until they are golden brown. The result will be less greasy, but also less crispy.
Serving and storing ready-made arancini
Serve arancini hot, freshly fried. They are most delicious in the first 10-15 minutes, when the cheese is still stringy and the outer layer is crispy. Serve with tomato pasta sauce, fresh tomato sauce, or simply with lemon zest.
Chilled arancini can be stored in an airtight container in the refrigerator for up to 3-4 days. To restore their crispness, reheat them in the oven at 180 °C for 10 minutes.
Freeze the breaded arancini (before frying) on a baking sheet, then transfer them to a freezer bag. They will keep for up to 3 months. Fry them straight from the freezer, adding only 1-2 minutes to the frying time.
Frequently asked questions about arancini
Question: Why is my risotto too runny and the arancini crumble when I shape them?
Answer: Risotto can remain too runny for several reasons. First of all, make sure you cook the rice long enough and that enough liquid has evaporated. Secondly, the egg should only be added after the risotto has cooled down. If the risotto is still too runny, place it in the refrigerator for a longer period of time — 3 to 4 hours or even overnight. The cold will help the rice bind more tightly. If this does not help, add a little more grated cheese when stirring the cooled risotto.
Question: Do I need to use real saffron, or can I use turmeric?
Answer: Saffron and turmeric have very different flavors and aromas. Saffron has a delicate, somewhat floral flavor, while turmeric is more earthy. If you absolutely cannot find saffron or it is too expensive, turmeric will give a similar golden color, but the flavor will be different. If you have the opportunity, buy high-quality, fresh saffron—it really makes a difference.
Question: Can arancini be made gluten-free?
Answer: Yes, you can. Replace wheat flour and breadcrumbs with gluten-free alternatives. You can use rice flour, tapioca starch, or a commercial gluten-free flour blend. For breading, you can use gluten-free breadcrumbs. The rice, egg, and filling are already gluten-free.
Question: My arancini break apart during frying. How can I prevent this?
Answer: This happens for several reasons. First, the rice balls may contain too much filling. Start with less filling (about 1 tablespoon). Second, make sure that the outer layer of rice tightly covers the filling—without any gaps. Third, this sometimes happens when the rice is not cooled enough or when the oil temperature is too high, causing the moisture inside to evaporate quickly. Use cooled risotto and check the oil temperature with a thermometer.
Question: How long does it take to prepare arancini from start to finish?
Answer: If you already have the ragout and chilled risotto, shaping, breading, and frying will take about 30-45 minutes. However, if you are preparing everything from scratch (risotto + ragout), expect it to take 2-3 hours, including cooling time. Tips: Prepare the ragout the day before, and the risotto can be made 1-2 days in advance. Then, on the day of serving, all you have to do is shape, bread, and fry.
Question: What sauce should I serve with arancini?
Answer: Arancini are traditionally served with a simple tomato pasta sauce or garlic sauce. Some people simply squeeze lemon juice on top. Orange sauces are not very common, as arancini are quite rich on their own. If you are making a seafood variation, a white wine or mineral vinaigrette-based sauce would be a good choice.
Question: Can arancini be frozen without breading?
Answer: Yes. Once formed, arancini can be frozen on a baking sheet before breading, then transferred to a freezer bag. Take them out of the freezer, let them thaw at room temperature for 10-15 minutes, and then bread and fry them as usual. However, this is a little trickier, as frozen arancini may fall apart during breading. It is easier to bread them before freezing.
Conclusion: arancini as Sicilian cultural heritage
Arancini are not just an appetizer or side dish, but a true cultural relic of Sicily and all of Italy. Their history spans more than a thousand years, from Arab influences to royal hunts, from the festive tables of the wealthy to street kiosks where hungry passengers await them. Each arancina is a small masterpiece, wrapped in a golden shell, full of aroma, taste, and tradition.
Making arancini takes time, attention, and some culinary skills, but the result is worth it. When you bite into a hot, freshly fried arancini and hear the gooey melted cheese ooze in your mouth alongside the soft risotto and crispy breading, you’ll understand why this humble dish has survived the centuries and remains as popular today as it was in the days of King Federico II.
Whatever you choose—the classic recipe with meat and mozzarella, a vegetarian version with mushrooms, or something more experimental—may your culinary experience of making arancini bring joy to both you and your guests. It is truly one of the most rewarding dishes to prepare in your home kitchen.
1. Заварте шафран у гарячому бульйоні на 10-15 хвилин. 2. Розігрійте оливкову олію та вершкове масло, додайте рис. Помішуйте 1-2 хвилини. 3. Вилийте біле вино, дайте випаруватися. 4. Поступово додавайте теплий бульйон, помішуючи протягом 15-18 хвилин. 5. За 2-3 хвилини до кінця додайте шафранну суміш. 6. Зніміть з вогню, додайте вершкове масло, сир, яєчний жовток. Помішуйте. 7. Охолодіть ризотто на деко, а потім у холодильнику 2-3 години. 8. Приготуйте рагу: обсмажте цибулю, додайте фарш, томатну пасту, вино та бульйон. Тушіть 30-40 хвилин. 9. Сформуйте кульки з охолодженого ризотто, додавши в центр рагу та моцарелу. 10. Панірируйте: борошно → яйце → панірувальні сухарі. 11. Обсмажте у гарячій олії (175-180°C) 2-3 хвилини до золотистого кольору. 12. Викладіть на серветку для видалення олії. Подавайте гарячими з томатним соусом.
Інгредієнти
Інструкція