
Gyros is not just fast food, it is the soul of Greek street cuisine, which has won the hearts of millions of people around the world over the centuries. The name comes from the Greek word γύρος, which literally means “rotation” — this is how this culinary wonder is prepared on a vertical spit.
At first glance, gyros seems like a simple dish: few ingredients, quick to prepare, unassuming presentation. But in reality, it is a culinary masterpiece in which every detail matters. The right pita bread, perfectly marinated meat, unique tzatziki sauce, fresh vegetables — all of these elements must work in perfect harmony. In this detailed article, we will examine every aspect of this remarkable dish, from its history and origins to advanced culinary techniques.
Content
Chapter 1: The History of Gyros — From Asia Minor to the World
Origin and cultural debate
The history of gyros is a fascinating story of migration, cultural mixing, and culinary evolution. Although many people consider gyros to be exclusively a Greek dish, its origins are more complex and interesting.
Vertical meat roasting has ancient roots in the Middle East and Asia Minor. Historians suggest that this method was borrowed by the Greeks from the Turks and Persians, but the Greeks adapted it to their tastes, creating a unique version.
At the beginning of the 20th century, when Greece and Turkey exchanged populations after the Greco-Turkish War, millions of Greeks emigrated from Asia Minor to Greece. They brought with them the tradition of vertical meat roasting, which the Turks called “kebab.” The Greeks reworked this idea, adding their own ingredients, their own spices, and, most importantly, their unique tzatziki sauce.
Thus, the modern gyros is the result of a synthesis of Eastern culinary traditions and Greek culinary identity. It is not a copy of the Turkish doner, but an authentic Greek adaptation that has developed into an independent dish.
Legends about gyros
There is a wonderful legend about the origin of gyros. According to the story, in the 1920s in Thessaloniki, a Greek chef named Georgios Pralies watched Muslim chefs preparing doner kebabs. Pralies was so fascinated by this technique that he decided to try to adapt it for Greek cuisine. He began using chicken instead of just beef, added Greek spices and lemon juice, and then invented tzatziki sauce. The result became so popular that today gyros is considered a typical Greek dish.
Although this story is not confirmed by historical documents, it conveys the essence of how gyros came about—through the culinary genius of blending tradition and innovation.
Gyros in Thessaloniki: The capital of gyros
When talking about gyros, it is impossible not to mention Thessaloniki. This ancient city on the northern coast of Greece is considered the unofficial capital of gyros. Thessaloniki has a unique gyros culture, where this dish is not just food, but part of the city’s identity.
In Thessaloniki, gyros are prepared according to special recipes that have been passed down from generation to generation. The meat is marinated in a special way, using specific spices and in specific proportions. Gyros in Thessaloniki are famous for their generous portions of meat, the obligatory presence of fried potatoes inside the pita, and the perfect balance of flavors.
There is a humorous saying that “if you’ve eaten gyros anywhere other than Thessaloniki, you haven’t eaten real gyros.” This is, of course, an exaggeration, but it reflects the pride that the people of Thessaloniki take in their culinary heritage.
World Gyros Eating Day
In 2015, Facebook announced that May 3 would be World Gyros Day. This celebration arose organically — not by decision of any international organization, but through the shared desire of gyros lovers to honor this outstanding dish.
Thessaloniki remains the epicenter of the celebration, but today people from all over the world join in by simply buying and enjoying gyros on May 3. Every year, this day gains popularity, becoming an unofficial global gyros holiday.
Section 2: The difference between gyros, doner, shawarma, and other similar dishes
People often confuse gyros with other similar dishes cooked on a vertical spit. Let’s take a look at their differences:
Gyros (Greece)
Gyros is the Greek version of vertically roasted meat. Main characteristics:
- Meat is often cooked with spices, including oregano, paprika, and garlic.
- The main base is pita (Greek flatbread 2-4 cm thick)
- Classic sauce — tzatziki (based on yogurt, cucumber, and dill)
- Be sure to add fried potatoes inside the pie.
- A serving starts with half the meat compared to a doner kebab.
- Lighter, fresher taste thanks to tzatziki
Doner kebab (Turkey)
Doner — the Turkish version, from which gyros is partly derived:
- Meat is often marinated in water, vinegar, and spices.
- Served in lavash or on a plate
- Popular sauce — tahini and hot sauces
- A larger and more generous portion of meat
- Often without potatoes inside
- More intense, meaty flavor
- Street food in Turkish culture
Shawarma (Middle East / Arab countries)
Shawarma is the Arabic version of vertically roasted meat:
- Meat is often marinated in water and spices with more warming notes.
- Served in lavash or pita bread
- Popular sauces — hot side dishes, better than mayonnaise, tomato paste
- Often contains hummus inside
- Add hot sauces and garnishes
- More piquant, hot taste
- A common street food in the Levant and throughout the Arab world
The main differences are shown in the table below.
| Parameter | Gyros | Doner | Shawarma |
|---|---|---|---|
| Origin | Greece | Turkey | Middle East |
| Basic foundation | Soft pita bread | Lavash or plate | Lavash or pita bread |
| Classic sauce | Dadziki | Tahini | Hot sauce |
| Potatoes | Required | Occasionally | Occasionally |
| Taste profile | Fresh, sour | Meaty, rich | Sharp, hot |
| Serving | Average | Large | Large |
| Spiciness | Moderate | Moderate | High |
Section 3: In-depth analysis of gyros ingredients
Meat: Selection and preparation
Meat is the heart of a gyros. Choosing the right meat greatly affects the final result. Let’s take a look at each option:
Chicken
Chicken is the most popular choice for homemade gyros for several reasons:
Advantages of chicken:
- High protein content (20-25% of weight)
- Fewer calories than pork (120-160 kcal per 100 g)
- A lighter, diet-friendly option
- Lighter on the bird, faster to cook
- More affordable
- Absorbs spices well
- Less fatty, so it doesn’t feel heavy on the stomach
What to look for when choosing chicken:
- Select chicken breast or thigh (meatier)
- 70% fillet and 30% thigh for the perfect balance
- The meat should be pink, not gray.
- Freshness is critical — buy on the day of preparation
- Refuse defrosted pieces — they lose their juice.
Calorie content of chicken gyros: A typical serving of chicken contains 400-500 kcal.
Pork
Pork is a classic choice in Greece and Thessaloniki. The meat is fattier and tastier than chicken:
Advantages of pork:
- More flavor and aroma
- Higher fat content makes meat juicier
- The traditional choice in Thessaloniki
- Better moisture retention during cooking
- A more “meaty” aroma
Disadvantages of pork:
- More calories (180-250 kcal per 100 g)
- Heavier on the stomach
- More expensive than chicken
- Higher saturated fat content
Calorie content of pork gyros: 500-650 kcal per serving.
Beef
Beef — less commonly used, but some people prefer this option:
Beef characteristics:
- Nailin’s meaty taste
- Darker meat color
- The high collagen content makes the meat tender.
- More time needed for marinating
- Higher costs
Mixed gyros
Many professional gyros makers prepare gyros from mixed meat:
- 50% chicken, 50% pork — the perfect compromise
- 70% chicken, 30% pork — for the diet version
- 30% chicken, 70% pork — for maximum flavor
This allows you to enjoy the benefits of both types of meat.
Spices: Secret combination
Spices are what distinguish gyros from simple fried meat. Let’s take a closer look at each spice:
Oregano (wild marjoram)
Oregano is the heart of gyros. This dried herb has a fragrant, warm, slightly bitter taste:
- It is best to use Mediterranean oregano.
- Dried oregano has a stronger aroma than fresh oregano.
- Add to the marinade as one of the first spices
- Optionally, you can add fresh oregano at the end.
- Recommendation: 1-2 teaspoons per 1 kg of meat
Smoked paprika
Paprika gives gyros a smoky aroma and warm color:
- Use smoked paprika (la vera) instead of regular paprika.
- Gives meat a pleasant red color
- It had a strong aroma, so don’t overdo it.
- Recommendation: 1 teaspoon per 1 kg of meat
Cumin
Cumin is a warm, delicate spice that adds depth of flavor:
- Has a nutty, warm aroma
- Traditionally used in the Middle East
- Pairs well with garlic and vinegar
- Recommendation: 1-1.5 teaspoons per 1 kg of meat
Coriander
Coriander adds lemon notes and lightness:
- Has a light, slightly floral aroma
- Combines well with zira and garlic
- Use only ground coriander
- Recommendation: 0.5-1 teaspoon per 1 kg of meat
Thyme
Thyme reveals rich, earthy notes:
- Has a bitter, warm aroma
- Pairs well with oregano
- You can use fresh thyme for a more intense flavor.
- Recommendation: 0.5-1 teaspoon per 1 kg of meat
Garlic
Garlic is an indispensable ingredient:
- Use fresh garlic, not powder
- Pass through a press or chop finely
- Garlic activates all other spices
- Add to the marinade after the other spices.
- Recommendation: 3-4 cloves per 1 kg of meat
Hot spice mix
About the professional combination: some gyros makers prepare their own mixture for gyros:
- Oregano — 40%
- Smoked paprika — 20%
- Zira — 15%
- Coriander — 10%
- Thyme — 10%
- Black pepper — 5%
Mix all the spices together and store in an airtight container.
Lemon juice and vinegar
Acidity is a critical element of marinating:
Lemon juice:
- Adds lightness and freshness
- Activates enzymes that make meat more tender
- A traditional choice in Greek cuisine
- Add freshly squeezed juice
- Recommendation: 1-2 tablespoons per 1 kg of meat
Vinegar (apple cider or wine):
- More aggressive acid
- Penetrates deeper into the meat
- Creates a more balanced taste
- Use if you don’t have lemon
- Recommendation: 1 tablespoon per 1 kg of meat
Olive oil
Olive oil is not just an additive, it is an ingredient:
Types of olive oil:
- Extra Virgin — the most aromatic, for embroidery
- Virgin — for marinating
- Pure — for frying
Recommendations:
- For marinating: 100-150 ml per 1 kg of meat
- For frying: depends on the pan, usually 30-50 ml
- Use Virgin or Pure for frying, as Extra Virgin burns at high temperatures.
- The quality of the oil affects the taste, so don’t skimp on this.
Chapter 4: Authentic gyros recipe — step by step
Now let’s move on to the practical part. Here is a detailed, time-tested recipe:
Recipe 1: Classic chicken gyros for 4 large servings
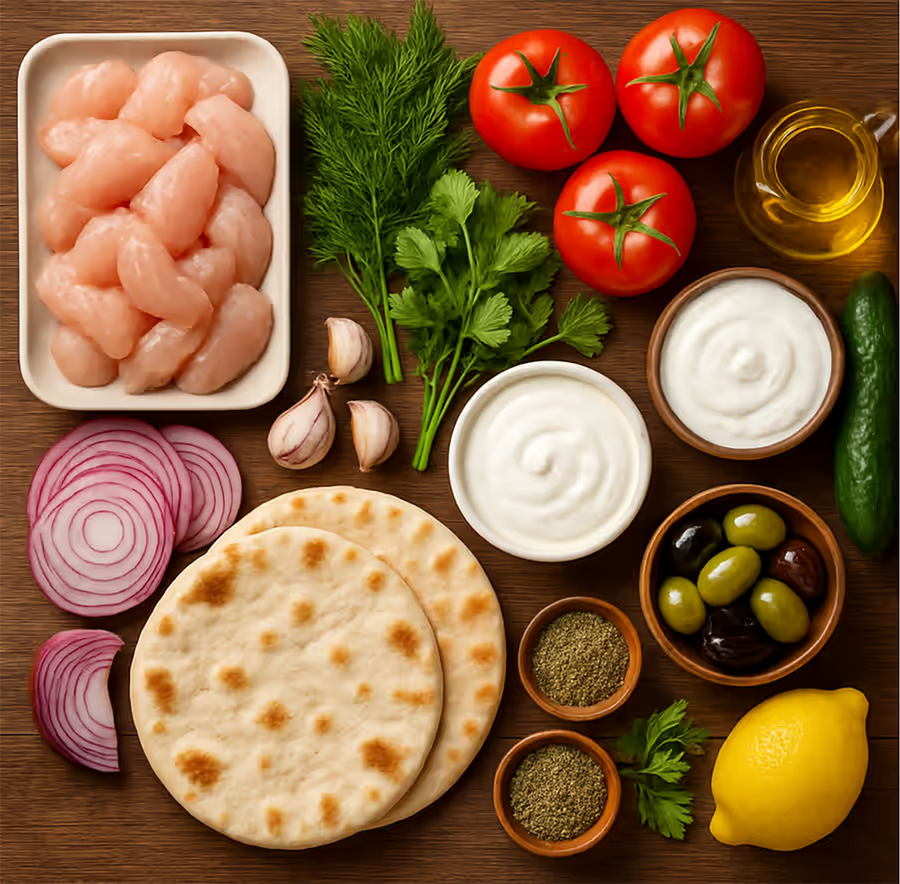
Ingredients for meat
Meat:
- Chicken fillet — 600 g
- Chicken thigh — 400 g
- Extra Virgin Olive Oil — 3-4 tablespoons
- Lemon juice — 1.5 tablespoons
Spices and seasonings:
- Dried oregano — 2 teaspoons
- Smoked paprika — 1 tsp.
- Dried thyme — 1 tsp.
- Cumin — 1 teaspoon
- Ground coriander — 0.5 tsp.
- Fresh garlic — 4 cloves
- Sea salt — 1 tsp.
- Ground black pepper — 0.5 tsp.
Ingredients for the dough
- Wheat flour / bread flour — 500 g
- Warm water (35-38°C) — 280-300 ml
- Dry yeast — 7 g (or 15 g fresh)
- Table salt — 1.5 tsp.
- Sugar — 1.5 teaspoons
- Vegetable oil or olive oil — 30 ml
- Flour for dusting — as needed
- Olive oil for greasing the dough — 15 ml
Ingredients for tzatziki sauce
Main version:
- Natural yogurt, 10% fat — 250 ml (or Greek yogurt, 300 ml)
- Fresh medium cucumber — 2 pieces.
- Fresh dill, finely chopped — 20 g (1 bunch)
- Fresh parsley, finely chopped — 15 g (half a bunch)
- Fresh garlic — 2-3 cloves
- Lemon juice — 0.5 pieces (1 tablespoon)
- Extra Virgin Olive Oil — 2 tablespoons
- Sea salt — 0.5 tsp.
- Ground black pepper — 0.25 tsp.
- Apple cider vinegar (optional) — 1 teaspoon
Ingredients for filling
- Fresh medium tomatoes — 3 pieces.
- Red onion — 1 piece
- Fresh lettuce leaves (iceberg, flax, etc.) — a few leaves
- Pitted olives — 50 g
- Homemade fried potatoes — 300-400 g (prepared separately)
- Fresh dill for garnish — to taste
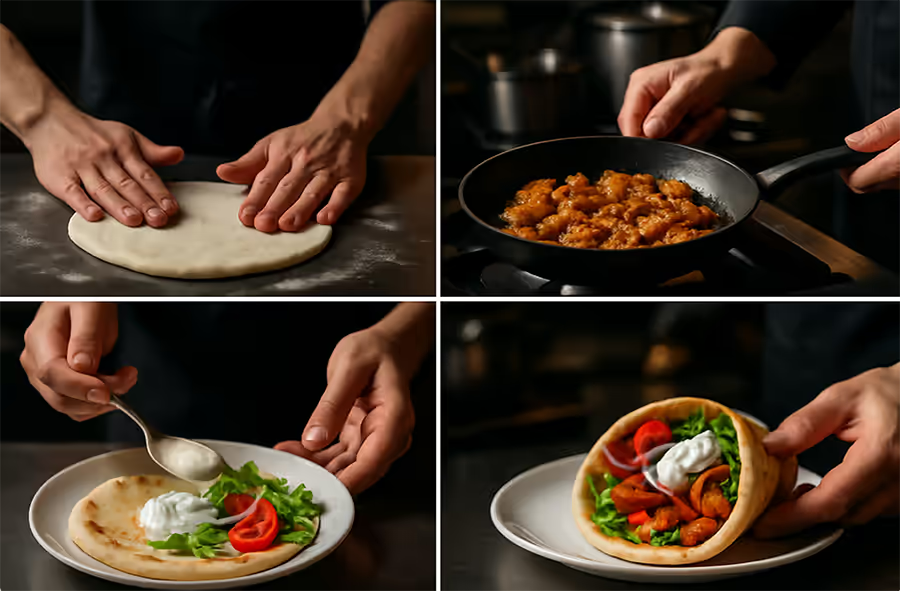
Step 1: Preparing the dough for pita bread
This is the most important step, as the quality of the gyro directly affects the quality of the gyro.
1.1. Yeast activation
In a deep bowl, mix the flour, salt, and sugar. If you are using regular powdered yeast, it is already activated, so you can skip this step.
If you have fresh yeast:
- Take 15 g of fresh yeast
- Mix them in a separate bowl with 50 ml of warm water (25-30°C).
- Add a pinch of sugar
- Leave for 5-10 minutes until foam appears (this means that the yeast is alive).
- Then add to your dough
1.2. Kneading the dough
Gradually pour warm water into a bowl containing flour, salt, and sugar, stirring simultaneously with a spoon or mixer on low speed. The water should be warm, but not hot (30-38°C).
Continue mixing until a smooth consistency is achieved. When most of the flour is moistened, switch to kneading the dough with your hands.
Recipe for manual mixing:
- Let the dough rest on the table
- Do it with your hands: pull the edge toward the center, press down
- Rotate the dough 90 degrees and repeat.
- Do this for 8-10 minutes.
The dough should be elastic, smooth, not too sticky, but not dry either. If it is sticky, add a little flour. If it is dry, add a little water.
1.3. Adding oil
After kneading for 5-7 minutes, add 30 ml of vegetable oil. This will ensure that the dough is soft and elastic.
Continue kneading for another 2-3 minutes until the oil is evenly distributed.
At this stage, the dough should be:
- Soft but not sticky
- Elastic and smooth
- Uniform color
- Not tied (if tied, the pita will be hard)
1.4. First proofing
Place the dough in a bowl greased with oil. Turn the dough so that it is covered with oil on all sides. Cover the bowl with a damp towel or plastic wrap.
Leave at room temperature (22-24°C) for 45-60 minutes (or up to 1.5 hours in a cool room). The dough should double in size.
Test to see if the dough has risen:
- Press your finger on the dough
- If the finger mark remains, the dough is ready.
- If the reply expires, more time is needed.
Some people prefer a long cold proofing time (8-12 hours in the refrigerator). This creates a stronger flavor and better gluten structure.
Step 2: Marinating the meat
While the dough is rising, let’s work with the meat.
2.1. Meat preparation
Remove the chicken breast and thigh from the refrigerator. The meat should be chilled, but not frozen.
Using a sharp knife, cut the meat into thin strips 2-3 cm thick. Each strip should be made from the meat inside, not the skin.
Cooking tip: If the meat is too soft to slice, place it in the freezer for 15 minutes to make it easier to slice.
2.2. Preparing the marinade
In a large bowl, mix the olive oil with the lemon juice.
Add all the dry spices: oregano, paprika, thyme, cumin, and coriander. Mix well so that the spices break down and blend together.
Press the garlic (or chop finely) and add to the marinade.
Add sea salt and black pepper. Stir everything again.
Tip: If the spices are too dry, add 2-3 tablespoons of hot water to the marinade. This will help the spices break down and spread.
2.3. Marinating meat
Place the sliced meat in a bowl. Pour the marinade over it. Using your hands or a wooden spoon, mix the meat thoroughly with the marinade, making sure that each strip is well coated.
Marinating times:
- Minimum: 20 minutes
- Optimal: 30-60 minutes
- Maximum: up to 4 hours
Longer marinating gives a richer flavor, but be careful not to overcook the meat in a sour marinade (lemon juice can “cook” meat vigorously).
Chef’s tip: If you are in a hurry, let the dough rest for 20 minutes, then start marinating. The dough will rise while the meat is marinating.
Step 3: Preparing the tzatziki sauce
Tzatziki is the magic of gyros. The right sauce makes the difference between an ordinary gyros and a priceless one.
3.1. Preparing cucumbers
Peel 2 medium cucumbers. Rinse under cold water.
There are two options:
- Option 1: Peel the cucumber with a knife or vegetable peeler, then grate it using a coarse grater.
- Option 2: Grate on a coarse grater with the skin on (better for flavor)
3.2. Moisture removal
This is an important step! Excess moisture makes the sauce runny.
Place the grated cucumber in a clean towel or cheesecloth. Gather the edges of the towel and squeeze the cucumber well, removing as much moisture as possible.
Wild cooks squeeze cucumbers one by one, obtaining little juice. The result should show a solid mass of cucumber without moisture.
3.3. Chopping greens
Clean and finely chop the dill and parsley. You should have about 20 g of dill and 15 g of parsley.
Tip: Do not use hot or wilted greens, as they will lose their aroma during storage.
3.4. Preparing garlic
Peel 2-3 cloves of garlic. Pass through a press or chop finely.
Hot garlic option: Some chefs lightly fry garlic in olive oil over low heat (30 seconds) to make it softer and less pungent. This adds a more nuanced flavor.
3.5. Preparing the sauce
In a bowl, mix the yogurt with finely chopped dill and parsley.
Add the grated cucumber. Add the garlic.
Pour in olive oil and lemon juice. Add sea salt and black pepper.
Mix well, stirring the sauce several times.
3.6. Infusion and storage
Cover the dish with sauce with plastic wrap and refrigerate for 20-30 minutes before serving.
This allows the flavors to blend together. The sauce can be stored in the refrigerator for up to 3 days in an airtight container.
Tip: If the sauce has become too sour (the cucumbers have released water), mix it with plain yogurt.
Option with hot garlic and oil:
For a more intense flavor, some people prepare dzadzik as follows:
- Heat 3 tablespoons of olive oil over medium heat.
- Add 3-4 finely chopped garlic cloves
- Fry for 30-40 seconds until the garlic is cooked through but not browned.
- Pour this hot oil over cold yogurt.
- Mix well and leave to cool.
This creates a sauce with a deeper flavor.
Step 4: Shaping and frying the pita
4.1. Dividing the dough
Remove the dough from the bowl. Divide it into 4 equal balls weighing about 125-150 g each.
Now gently flatten the ball with your hands into a flat disc.
4.2. Rolling out the dough
Place the first ball on a table sprinkled with flour.
Using a rolling pin, roll out the dough into a thin circle with a diameter of 18-20 cm and a thickness of 2-3 mm.
The most important thing is uniform thickness. If the pita is not the right thickness, some parts will be raw and others will be overcooked.
4.3. Frying pita bread
Heat a cast iron skillet over medium-high heat. The skillet should be very hot, but not boiling.
Test: Drop a drop of water—it should stick to the contact.
Place the rolled-out dough on a dry frying pan. Fry for 2-3 minutes on one side.
Hot plumes and small bubbles should appear on the surface.
Carefully flip the pita with a wooden spatula. Fry for another 2-3 minutes on the other side.
Remove the finished pita bread onto a plate.
Tip: Some people like to poke the pita with a wooden skewer while baking — this helps to keep it soft and remove excess air.
4.4. Storage of finished dough
Place the finished cakes in a towel to keep them warm. Breakfast can be ready several hours before serving if stored properly.
An alternative method of frying pita bread:
Instead of frying in a pan, some people bake pita bread in the oven:
- Preheat the oven to 210-220°C.
- Place the rolled-out dough on parchment paper.
- Brush with a little olive oil
- Bake for 12-15 minutes until golden brown.
- This is a healthier option, but the pita will be less chocolatey.
Step 5: Frying the meat
5.1. Preparing the pan
Heat a large cast iron skillet over medium heat.
Add 2-3 tablespoons of olive oil. The oil should be heated, but not burned.
Test: A sound is heard when you throw meat into a frying pan.
5.2. Frying meat
Place the marinated meat in a single layer in the pan. It is important that the meat does not overlap, otherwise it will boil instead of fry.
If there is too much meat, fry it in 2 batches.
Fry over medium heat for 6-8 minutes, stirring frequently. The meat should turn golden brown with slightly charred edges.
Properly fried meat has a beautiful golden color with caramelized edges. This means that the water has been released from the meat and the Maillard reaction (a chemical reaction that creates taste and aroma) has begun.
**5.3. Readiness check
The meat is ready when:
- Dostup has a golden color
- Meat without liquid
- Meat falls easily without deformation
- Internal temperature = 75°C (if you cook often, then dream)
**5.4. Final taming
At the end of frying, you can add to the meat:
- 1 tsp dried oregano (to enhance the flavor)
- 1 teaspoon fresh lemon juice (for freshness)
- A pinch of ground pepper
Remove the meat from the pan and place it in a covered dish to keep warm.
Step 6: Preparing vegetables and side dishes
6.1. Cutting tomatoes
Wash the tomatoes and cut them into thin slices 3-5 mm thick or into quarters, depending on your preference.
Tip: Remove the seeds from the tomatoes with a small spoon so that the gyros does not become soggy.
6.2. Chopping onions
Cut the red onion into very thin half-moons (2-3 mm).
Some people like to marinate the onions beforehand:
- Place the chopped onion in a bowl.
- Pour equal parts vinegar and water (for example, 1 tablespoon vinegar + 1 tablespoon water).
- Add a pinch of salt
- Leave for 15-20 minutes
- Drain the liquid before use.
This makes the onion softer and less pungent.
**6.3. Greens and olives
Tear the lettuce leaves into bite-sized pieces. Clean and place on a plate.
Lightly pound or chop the pitted olives.
6.4. Fried potatoes
Potatoes are an essential component of authentic gyros, especially in Thessaloniki.
Method 1 — Homemade fried potatoes:
- Peel the potatoes and cut them into 4-5 mm thick strips.
- Soak in cold water for 15-20 minutes to remove starch
- Pour well
- Heat vegetable oil to 170-180°C.
- Fry the potatoes in two batches: 3-4 minutes (until golden brown), then remove.
- Stop the temperature at 190°C
- Fry for another 2-3 minutes until golden brown.
- Drain the oil, season with salt and pepper
- Serve hot
Method 2 — Baked potatoes:
- Cut the potatoes into strips.
- Coat with olive oil
- Bake at 200°C for 20-25 minutes, stirring once halfway through.
- The salts and the feathers
Method 3 — Ready-made baby potatoes or crispy fries from prepared ingredients
Step 7: Assembling the gyro
This is the moment of truth! Everything is ready, now let’s assemble the gyros.
7.1. Basic compilation methodology
Place the finished warm pita on a work surface or deep plate.
Place 2-3 lettuce leaves on one half (the bottom half, as seen from your perspective).
Add 100-150 g of fried meat.
Add to the meat:
- 2-3 slices of tomato
- 3-4 onion halves (regular or pickled)
- 1 tbsp. fried potatoes
- A few olives
7.2. Adding sauce correctly
Pour 2-3 tablespoons of tzatziki sauce directly onto the vegetables. Do not pour too much, otherwise the gyros will be too wet.
Cooking tip: Hold the gyros in one hand at a slight angle so that the liquid does not spill over the edges.
7.3. Wrapping the gyros
This art requires practice:
- Free up space (upper half) above the filling
- Fold one side toward the center, wrapping part of the filling
- Move your position to the opposite side
- Finally, roll the gyros into a tube at the protruding end.
An alternative method is the “envelope” method:
- Fold the pita in half diagonally.
- Then fold the edges inward.
- An envelope with filling inside is produced
7.4. Packaging and presentation
If serving immediately: place the prepared gyros on a plate.
If you need to take it with you: wrap the gyros in parchment paper or foil up to the height of the first half.
Serve immediately while the pita and meat are hot.
Tip: Some people like to eat gyros with a fork and knife, holding it in parchment paper. Others just use their hands. The choice is yours.
Chapter 5: Advanced Gyro Variations
1. Gyros with pork (Thessaloniki style)
The classic version from Thessaloniki uses pork for a meatier flavor.
Features:
- Purchase ratio: 70% beech, 30% ash
- The meat is marinated for 2-3 hours.
- Add 1 teaspoon of honey to the marinade.
- Fry for 10-12 minutes over medium-high heat.
Marinade ingredients (for 1 kg of meat):
- Olive oil — 4 tablespoons
- Lemon juice — 2 tablespoons
- Dried oregano — 2 teaspoons
- Smoked paprika — 1.5 tsp.
- Thyme — 1 tsp.
- Garlic — 4 cloves
- Honey — 1 tsp.
- Thinly sliced onion — 0.5 pieces.
- Salt and pepper — to taste
2. Beef gyros
For those who love the rich taste of meat.
Features:
- Use meat from the calculated times of the press (breast, muscle)
- Marinate for at least 1-2 hours
- Cut the meat a little thicker (3-4 cm), as beef dries out faster.
- Fry for 12-15 minutes
Taste profile: More profound, more “meaty,” with earthy notes
Marinade ingredients (for 1 kg of meat):
- Olive oil — 4 tablespoons
- Wine vinegar — 1.5 tablespoons
- Lemon juice — 0.5 tablespoon
- Dried oregano — 2 teaspoons
- Smoked paprika — 1 tsp.
- Fresh rosemary — 2-3 sprigs (or 1 teaspoon dried)
- Garlic — 4 cloves
- Ground pepper — 0.5 tsp.
- Salt — 1 tsp.
3. Mixed gyros (50/50 chicken and pork)
The perfect compromise for those who want the best of both worlds.
Advantages:
- More succulent meat thanks to pork fat
- Lighter thanks to the chicken
- More interesting taste due to the combination
- Fewer calories than pure pork, but more flavor than chicken.
Recipe:
- 500 g chicken fillet
- 500 g pork ear or fatty fillet
- The array is like a regular recipe, but keep in mind the marinating time: 30-45 minutes.
4. Vegetarian gyros
For those who don’t eat meat but still want a gyros.
Option 1: Eggplant and zucchini gyros
Ingredients:
- 500 g eggplant (cut into 1 cm cubes)
- 300 g zucchini (cut into slices)
- Tomatoes 200 g (cut into pieces)
- Olive oil 5 tbsp.
- Spices: 2 teaspoons oregano, 1 teaspoon paprika, 3 cloves garlic, 1 teaspoon thyme.
- Lemon juice 1.5 tbsp.
- Salt and pepper to taste
Preparation:
- Mix the eggplant and zucchini with olive oil and spices.
- Fry in a pan over medium heat for 10-12 minutes, stirring frequently.
- Add the tomatoes at the end and fry for another 2-3 minutes.
- Drizzle with lemon juice before serving.
Option 2: Gyros with chickpeas and vegetables
Ingredients:
- Canned chickpeas 400 g (drain and dry)
- Olive oil 3 tbsp.
- Spices: 1.5 teaspoons cumin, 1 teaspoon paprika, 3 cloves garlic, 20 g parsley
- Lemon juice 1.5 tbsp.
- Onion 100 g (chopped)
- Red bell pepper 100 g (chopped)
- Salt and pepper to taste
Preparation:
- Heat the oil over medium heat.
- Add chopped onion and pepper, fry for 3 minutes
- Add spices and garlic, fry for 1 minute
- Add the chickpeas, fry for 5-7 minutes, stirring
- Drizzle with lemon juice and sprinkle with parsley.
Option 3: Gyros with falafel
Classic vegetarian option:
Ingredients for falafel:
- 250 g dried chickpeas (previously soaked, but not cooked!)
- 1 medium onion
- Garlic 4 cloves
- Parsley 50 g
- Cilantro 20 g
- Flour 2 tbsp.
- Cumin 1 tsp.
- Coriander 1 tsp.
- Chili pepper 0.5 tsp.
- Salt 1 tsp.
- Vegetable oil for minced meat
Preparation of falafel:
- Soak the chickpeas overnight, then drain them.
- Place all ingredients in a blender.
- Select to the consistency of pâté (not puree!)
- Form balls or treats by gently pressing
- Fry in hot oil until golden brown.
- Place in a pita with vegetables and tzatziki.
5. Gyros with shrimp (seafood)
A modern variation for seafood lovers.
Ingredients:
- Large fresh shrimp 800 g
- Olive oil 4 tbsp.
- Lemon juice 2 tbsp.
- Spices: 1.5 teaspoons oregano, 1 teaspoon smoked paprika, 3 cloves garlic
- Salt and pepper to taste
- Fresh parsley 20 g
Preparation:
- Peel the shrimp and remove the intestines.
- Mix with marinade (oil, lemon juice, spices)
- Marinate for 20 minutes.
- Fry over medium heat for 4-5 minutes until the shrimp turn pink.
- Place in a pan with ricotta and vegetables
6. Gyros with eggplant and mushrooms
An option for those interested in mushrooms.
Ingredients:
- Mushrooms (oyster mushrooms, champignons, except thick ones) 600 g
- 300 g young cabbage (cut into strips)
- Olive oil 5 tbsp.
- Spices: 2 teaspoons oregano, 1 teaspoon thyme, 4 cloves garlic
- Lemon juice 1.5 tbsp.
- Soy sauce 1 tbsp.
- Salt and pepper to taste
Preparation:
- Cut the mushrooms into slices.
- Fry the mushrooms in oil for 5 minutes until the moisture evaporates.
- Add the chopped cabbage and fry for 3-4 minutes.
- Add the spices and garlic, fry for another minute.
- Drizzle with lemon juice and soy sauce.
- Choose from pita with vegetables and tzatziki
7. Gyros with various sauces
In addition to classic tzatziki, try other sauces:
Tahini-lemon sauce
- Tahini 100 ml
- Lemon juice 50 ml
- 50 ml water (for dilution)
- Garlic 2 cloves
- Salt and pepper to taste
Mix everything to the desired consistency.
Harissa hot sauce
- Harissa paste 50 g
- Olive oil 2 tbsp.
- Lemon juice 1 tbsp.
- Garlic 1 clove
- Water 2 tablespoons
Mix everything into a smooth consistency.
Basil and nut sauce
- Greek yogurt 150 ml
- Fresh basil 30 g
- 50 g Greek nuts (chopped)
- Olive oil 2 tbsp.
- Lemon juice 0.5 tbsp.
- Salt and pepper to taste
Blend the basil and nuts in a blender with the oil, then mix with the yogurt and lemon juice.
Chapter 6: Supplementary Knowledge and Profound Secrets
Temperatures and times: Science behind the gyroscope
The right temperature is half the battle:
Dough temperature:
- Water for dough: 35-38°C (if too hot, it will kill the yeast; if too cold, it will slow down the rising process)
- Dough after kneading: 24-26°C
- Proofing room: 22-24°C
Frying temperature:
- Frying pan for baking: 180-190°C (olive oil should be heated but not burning)
- Frying pan for meat: 170-180°C
- Deep fryer for potatoes (first batch): 170°C, (second batch): 190-200°C
Internal meat temperature:
- Turkey: 75°C
- Pork: 65°C
- Beef (rarely fried): 63°C
The deep secrets of professionals
Secret 1: Long cold proofing
Some gyros are prepared as follows:
- Knead the dough as usual.
- First proofing for 30 minutes at room temperature
- Then place in the refrigerator for 12-24 hours.
- Before use, remove 1-2 hours prior to room temperature.
This creates dough with a more pronounced flavor (thanks to the processes that occur at refrigeration temperatures) and better gluten structure.
Secret 2: Two-stage marinating
Professionals sometimes use a two-step marinating process:
Stage 1 (cold marinating):
- Mix the meat with half of the marinade.
- Place in the refrigerator for 2-4 hours.
- This allows the spices to penetrate deeply into the meat.
Stage 2 (hot marinating):
- Remove the meat from the refrigerator 30 minutes before frying.
- Mix with the rest of the fresh marinade.
- This activates the spices and enhances the flavor.
Secret 3: Adding sunflower seeds to water
Some gyros makers prepare the dough by adding 1-2 tablespoons of milk instead of some of the water. This makes the pita more crispy and light.
Secret 4: A hot start for frying meat
The quality of meat frying improves if:
- Remove the meat from the refrigerator 20 minutes before frying (so that it is easier to cut).
- Dry the cut with paper towels (wet meat sticks, does not fry)
- Heat the pan to a very high temperature (150°C+).
- Add the meat in batches so as not to cool the pan.
Secret 5: Dry frying tasks
Some professionals fry meat without oil:
- Heat the pan over very high heat.
- Add the meat directly to the dry pan.
- Fry for 2-3 minutes until the meat releases its juices.
- Then remove the meat to a plate and drain the liquid.
- Put the meat back with fresh oil
- Fry as usual
This removes excess liquid and creates a more caramelized surface.
Secret 6: Final “bath” in lemon juice
At the end of frying, some chefs:
- Remove the meat from the pan.
- Add 2-3 tablespoons of lemon juice to a hot pan.
- Scrape the pan with a wooden spoon, removing burnt particles.
- Return the meat for 20-30 seconds
This creates very aromatic, juicy meat.
Tips for proper formatting
Tip 1: Temperature game
When assembling a gyroscope, the following temperatures are important:
- The pita should be warm (40-50°C), but not hot.
- The meat should be hot (65-75°C).
- Ddzaziki should be cold (5-10°C).
The contrast in temperatures creates a pleasant sensation on the tongue and enhances the intensity of the flavors.
Tip 2: Correct order of laying
The order of arrangement affects how the content is distributed:
- Basic — salad (holds the filling)
- The main filling is meat (this is the filling tape).
- Vegetables — tomatoes, onions (spread evenly)
- Potatoes (poured on the sides)
- Sauce (last)
Tip 3: Wrapping technique
Wrapping a gyros correctly is an art:
Method 1 — Classic “envelope”:
- Try to place the pita slightly tilted.
- Take the bottom edge and bring it up to the center
- Then one side (usually the left)
- Then the other side (right)
- Finally, the top edge
- Result: square envelope with one open side
Method 2 — “Roulette”:
- Place all the filling in a single line slightly below the center.
- Start rolling the pita from the bottom edge.
- Release the first half to go during twisting
- Twist into a tube until the end
Method 3 — “Double wrapping”:
- First, fold the gyros into “envelopes.”
- Then fill it halfway as usual, like a roll.
Chapter 7: Advanced FAQ about gyros
The Question of Meat
Question 1: Should meat be marinated?
Yes, it is critical. Marinating serves several purposes:
- The marinade uses lemon juice or vinegar, which contain acids that “cook” the surface of the proteins and make the meat tender.
- The spices penetrate the meat, adding flavor from the inside out.
- The oil retains moisture inside the meat.
Minimum 15-20 minutes, optimally 30-60 minutes, maximum up to 4 hours.
Question 2: My gyros comes out dry. What should I do?
Causes and solutions:
- Insufficient marinating (solution: marinate for at least 30 minutes)
- Overcooking (solution: cook over medium heat)
- Frying for too long (solution: fry for 7-10 minutes, no more)
- The meat will freeze solid before use (solution: remove 30 minutes before frying).
- Not enough oil in the marinade (solution: add more oil)
Question 3: Can ready-made marinade mixes be used?
Yes, you can, but the quality will be inferior. Ready-made mixtures often contain garlic and onion powder instead of fresh garlic and onions, which makes the taste less vivid. It is better to make the marinade yourself; it only takes 5 minutes.
Question 4: What meat is best for gyros?
It all depends on your preferences:
- Chicken is the lightest, most dietary, and most affordable meat.
- Pork — juicier, tastier, higher in calories
- Mixing (50/50) — the golden mean
Some people like plain chicken, others like plain pork. Try a few variations and choose your favorite.
Question 5: When is the gyros ready? How do I know when it’s ready to fry?
The meat is ready to fry when:
- The meat is evenly coated with marinade.
- No visible flour or dry spots
- The meat is marinated for the required amount of time.
- The meat should be at room temperature or slightly warm.
If the meat is too cold from the refrigerator, remove it 20-30 minutes before frying.
Questions about the TEST and the pit
Question 6: Can I use ready-made pita bread?
Yes, you can. Ready-made pita bread from the supermarket saves time, but the quality is significantly worse than homemade. Ready-made pita bread often:
- Less aromatic
- Less soft
- Contains preservatives
- Dries faster
If you are using ready-made pita bread:
- Remove from packaging
- Heat in a dry frying pan for 20-30 seconds on each side.
- Use immediately, before it cools down
Question 7: My liquid smells or makes noise incorrectly. What am I doing wrong?
Possible causes:
- Insufficient proofing (solution: proof for two hours instead of one)
- Too much dry yeast (solution: use exactly 5-7 g per 500 g of flour)
- The water is too hot (solution: cool the water to 35-38°C)
- The dough is too dry (solution: add a little water)
- Too much oil (solution: use 30 ml per 500 g of flour)
Question 8: Can dough be stored?
So:
- Room temperature: up to 2 hours after proofing
- Refrigerator: up to 24 hours (cold proofing, as described above)
- Freezer: up to 3 months (place the dough divided into balls in a freezer bag)
For dough from the refrigerator/freezer:
- Defrost for 1-2 hours
- Let it cool at room temperature.
- Use as usual
Question 9: I don’t know about wild yeast?
Common yeast used:
- Dry instant yeast (SAF-Instant, Fleischmann’s, etc.) — 1 tsp = 5 g, use as much as possible
- Fresh yeast (yeast cake) — 3 tsp = 15 g fresh yeast = 5 g dry yeast
- Sourdough starter (for embroidered buns) — 1 kg of sourdough starter = 5 g of dry yeast
General rule: 1 part dry yeast = 3 parts fresh yeast.
Question 10: Is my gyro too soft or too hard?
- Too soft: the water is too hot or there is too much water. Next time, use water at 35-37°C and reduce the amount by 20 ml.
- Too stiff: insufficient kneading, water too cold, or too much flour. Next time, knead longer or add 1-2 tablespoons of water.
The question of tzatziki sauce
Question 11: My tzatziki sauce is too runny.
Reason: too much moisture from cucumbers.
Solution:
- Grate the cucumber and salt it.
- Leave for 10 minutes — the salt will draw out the moisture.
- After that, dry the cucumber thoroughly with a towel.
- Add to yogurt and other ingredients
Second option: if the sauce is already ready and too thin:
- Add more yogurt
- Or add 1-2 tablespoons of sour cream.
Question 12: Can you make dзадзики without cucumber?
Technically, it is possible, but it will no longer be authentic tzatziki. Cucumber is a critical ingredient. Tzatziki without cucumber is simply yogurt sauce.
Question 13: Can you make tzatziki without yogurt?
Not recommended. Yogurt is the basis of the sauce. You can use:
- Greek yogurt (preferably)
- Thick natural yogurt
- Yogurt without chemical additives
- Homemade yogurt
But you cannot:
- Sour yogurt (too runny)
- Drinking yogurt (too thin)
- Sour cream alone (too fatty)
Question 14: How should I store dзадзики?
Dadziki can be stored in an airtight container in the refrigerator for up to 3-4 days. Before eating:
- Stir if you see liquid on the surface.
- Check the taste
- You can add fresh parsley before serving to enhance the aroma.
Question 15: Is dzadzik hot or cold?
Dzhaziki is served exclusively cold. Hot yogurt loses its texture and taste. The filling can be hot, but the sauce must be cold. If you forgot to put the dzhaziki in the refrigerator:
- Place the miniature in the freezer for 5-10 minutes.
- Or add a few ice cubes just before serving.
Questions about serving and storage
Question 16: How should I store the finished gyros?
Gyros are best eaten hot. If there are any leftovers:
- Storage: in the refrigerator for up to 2-3 days in an airtight container
- Reheating: in the microwave for 2-3 minutes at 50% power, or in a pan over low heat
- Freezing: up to 1 month in the freezer (place separately, not whole)
Store separately in the refrigerator:
- Meat: up to 3-4 days
- Pita: up to 5-7 days
- Dadziki: up to 3-4 days
- Vegetables: up to 2-3 days
Question 17: Can gyros be prepared in advance?
Partially:
- Meat: marinate overnight, fry before serving
- Pita bread: prepare in the evening, use the next day (store in a bag)
- Dadziki: prepare one day before serving
- Vegetables: chop 2-3 hours before serving
Not recommended:
- Prepare the gyros in advance (it becomes wet).
- Keep roasted meat at room temperature for a long time (bacteria multiply)
More in-depth technical questions
Question 18: When I fry gyros, it often falls apart. What am I doing wrong?
Gyros breaks down due to:
- Hot sauce (solution: place the tzatziki in the refrigerator for 1-2 hours before serving)
- Too much sauce (solution: keep the sauce to 2-3 tablespoons per gyros)
- The pita is too thin or brittle (solution: practice the technique of rolling out the dough)
- Incorrect wrapping technique (solution: use the “envelope” method instead of the “roll” method)
- The pita has cooled down (solution: use the pita immediately after preparation, while it is still warm)
Question 19: How to properly finish the gyros so that it looks beautiful when served?
The aesthetics of the gyro are important:
- Use a nice deep plate
- Place the finished gyros at a slight angle (so that the filling is visible).
- Add fresh herbs (parsley, dill) around the gyros.
- Serve an extra bowl of tzatziki on the side.
- Add lemon wedges as a garnish
When serving for takeaway:
- Wrap the gyros in parchment paper.
- Then place in a paper bag
- Place additional sauce boxes on the side
- Don’t forget to add napkins and a fork.
Question 20: How can I tell that my gyros is “perfectly” ready without expert knowledge?
Signs of an ideal gyro:
- Appearance: pita bread is golden in color, with a smooth surface and no cracks.
- Smell: strong aroma of oregano and roasted meat
- To the touch: the pita is warm but not hot, and is elastic.
- When unfolding: the meat does not spill out, the sauce stays inside
- Taste: a harmonious combination of meat flavor with the acidity of tzatziki and the freshness of vegetables
- Consistency: the pita is not dry, but not wet either, the meat is juicy
If the gyros meets all these criteria, you are cooking it perfectly!
Chapter 8: Travel and useful tips
Tips for speeding up cooking
If you don’t have time for the whole process:
Quick gyros in 30 minutes:
- Knead the dough in the microwave (set to 10% power, heat for 30 seconds while kneading).
- Divide into balls, let them rest on a hot radiator for 10 minutes.
- While the dough is rising, prepare the meat and spices (do not marinate, just mix).
- Roll out the dough, fry it
- Fry the meat
- Make a gyros
Quick zadziky in 10 minutes:
- Use a frozen cucumber from the freezer (it is easier to squeeze and is already cold).
- Grate, sweet cheese miso
- Mix with yogurt, half a lemon, garlic, and herbs.
- Done!
Tips for saving time when cooking for many people
If you are preparing gyros for a party for 10-15 people:
- Knead the dough in advance (the day before serving, cold proofing).
- Prepare the meat in advance (marinate it in the evening).
- Roll out the dough and freeze it on skewers (you can defrost and fry them 20 minutes before serving).
- Prepare the dзадзики a day before serving.
- Cut the vegetables 2 hours before serving and store in an airtight container.
When serving:
- Fry the meat in portions in a frying pan.
- Heat the pita bread in a pan (20-30 seconds each)
- Assemble gyros one by one or let people assemble them themselves.
Tips for different regions and climates
Hot weather (summer, tropics):
- Use more dhadzhiki
- Add more fresh vegetables (more cucumbers, less potatoes)
- Store the ingredients in the refrigerator until the last minute.
- Serve with a cold drink
Cold weather (winter):
- Use more hot meat
- Add more potatoes and roasted vegetables
- Serve the gyros as hot as possible.
- Add more ingredients for calories
Health and diet tips
Diet version of gyros (fewer calories):
- Use chicken breast (less fat)
- Cut the potatoes or remove them
- Use more vegetables
- Replace regular yogurt with 0% fat yogurt.
- Reduce the amount of oil in the marinade
- Calorie content: 300-350 kcal
Protein version of gyros (for athletes):
- Use 200 g of meat instead of 150 g.
- Add feta or other white cheese
- Increase the number of tomatoes and cucumbers
- Cut the potatoes
- Add flax seeds to the tzatziki
- Calorie content: 500-600 kcal
Giro for cholera:
- Do not add potatoes
- Use more greens
- Reduce the sauce
- Use more vegetables
- Calorie content: 200-250 kcal
Conclusion: Gyros as a way of life
Gyros is not just food, it is culture. For Greeks, gyros is a symbol of city life, friendship, and shared moments. People gather around a gyros stand to discuss the news, tell stories, and share experiences.
When you make gyros at home, you’re not just cooking food. You’re creating a moment, bringing the spirit of Greek cuisine and hospitality into your kitchen.
In this article, we explored the history of gyros, its origins, how it differs from other dishes, a detailed recipe, variations, deep secrets, and answers to all possible questions. Now you have all the tools you need to make real, authentic gyros at home.
Try the classic recipe, then experiment with variations and find your favorite version. Try making twice as many gyros as you planned—they’ll be easy to eat!
The most important thing is to cook with love, use high-quality ingredients, and don’t be afraid to experiment. Every attempt makes you a better cook.
Καλή όρεξη (Kali orexi — a traditional Greek greeting before a meal, meaning “bon appétit”)!