
Pasteis de nata are one of the most famous desserts in Portuguese cuisine. These small pastries made of flaky puff pastry and filled with a delicate custard made from milk, egg yolks, sugar, flour, lemon zest, and cinnamon have long been a culinary symbol of Portugal. Traditionally, they are baked at a very high temperature so that the pastry has time to flake well, and the top of the cream caramelizes slightly, developing its characteristic dark spots.
Content
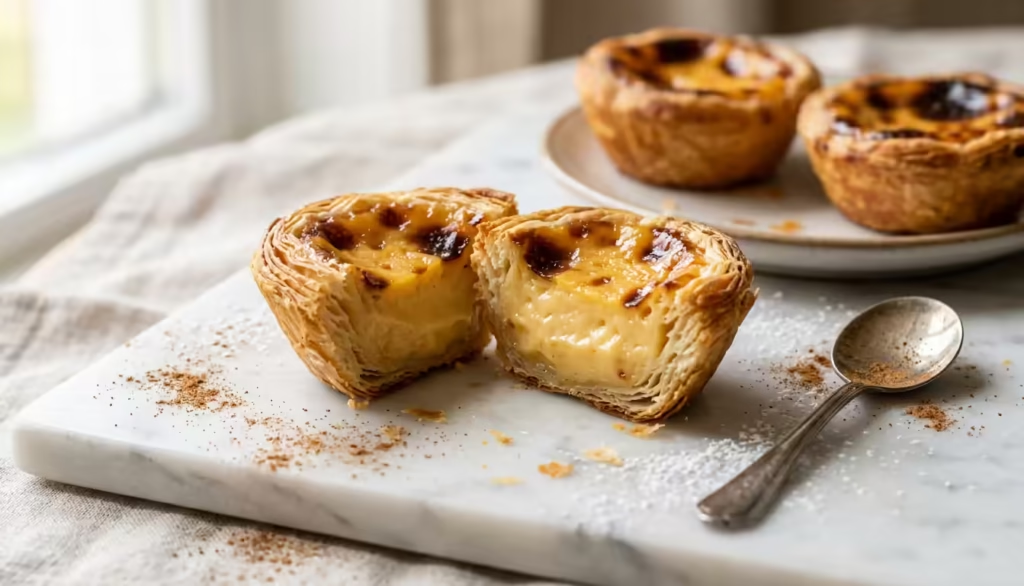
Simply put, pastéis are a dessert that combines two textures: a flaky, light, layered pastry and a thick, silky filling. It is this contrast that makes the pastéis recipe so popular. They taste delicate, creamy, and caramel-like, with a hint of citrus and a very comforting flavor.
What is a Pasteis?
On the Ukrainian internet, the term “pastéis” usually refers to pastéis de nata—Portuguese pastries made of puff pastry and custard. Historically, this dessert is associated with the Belém district of Lisbon and monastic culinary traditions. Over time, it has become one of Portugal’s most famous sweet symbols.
An important point to note: not every pastel de nata is a Pastéis de Belém. The name Pastéis de Belém refers to the original version of the dessert, while pastéis de nata is the general term for this type of Portuguese custard tart.
Today, these pastries are baked all over the world, but the classic recipe remains based on the same principles: flaky pastry, a delicate egg-yolk cream, the aroma of lemon zest and cinnamon, and a quick bake at a very high temperature.
Why are pastries so popular?
The reason for the popularity of these pastries is very simple: they’re a dessert that looks impressive but doesn’t require any hard-to-find ingredients. Milk, egg yolks, sugar, flour, puff pastry, cinnamon, and lemon—the ingredients are quite readily available, and the result looks like a dessert from a high-end bakery.
Another advantage is the recipe’s flexibility. You can make an almost authentic version using homemade puff pastry, or you can make a simplified homemade version using high-quality store-bought dough. Either way, if you make the cream properly and preheat the oven well, the result will be very close to the classic version.
What makes the perfect pashtesh?
Authentic pastéis de nata have several distinctive features:
- Thin, flaky, well-baked dough.
- A cream that holds its shape yet remains light.
- A light scent of cinnamon and lemon.
- A golden or slightly darker top with caramelized spots.
- Crispy edges and a juicy center.
- Small size, perfect for serving with coffee or tea.
The homemade version can be a bit simpler. For example, you can skip the starch and use just flour, or use store-bought puff pastry instead of rolling it out by hand. For most home kitchens, this is the most practical and convenient option.
Ingredients for homemade pastries
Below is a tried-and-true homemade recipe for pastéis de nata, adapted for a standard oven and using readily available ingredients.
Makes 12 pastries
For the dough:
- 500 g of high-quality yeast-free puff pastry
- A little flour for dusting
For the cream:
- 500 ml of milk
- 180–200 g sugar
- 35 g flour
- 6 egg yolks
- 1 egg
- 1 cinnamon stick or 1/2 tsp ground cinnamon
- A strip of zest from 1 lemon
- 1 tsp vanilla (optional)
- 30 ml of water
To serve:
- Ground cinnamon
- Powdered sugar, if desired
This blend perfectly captures the classic flavor profile: creaminess, the delicate richness of eggs, a subtle citrus note, and the warm spiciness of cinnamon.
Which dough should I choose?
There are two main ways to make this at home.
Option 1: ready-made puff pastry
This is the simplest solution. It saves time, reduces the risk of mistakes, and yields excellent results if the oven is properly preheated. For most home cooks, this is the best choice, especially if the article is aimed at a broad audience.
Important:
- Choose high-quality butter puff pastry.
- Let it thaw completely in the refrigerator.
- Do not overheat the dough while shaping it.
- Work quickly so that the layers don’t lose their shape.
Option 2: Homemade puff pastry
This is closer to the traditional method. In classic versions, the dough is rolled out, then rolled into a log and sliced into rounds, which are pressed into the molds with the fingers. It is this technique that creates the characteristic spiral layering inside the basket.
If you enjoy working with dough and want to create a visually appealing version for your blog, homemade puff pastry is a great option. But if your main goal is consistent results, go ahead and use store-bought.
What forms are required?
It’s best to use metal muffin tins or individual small tartlet pans. Metal heats up faster than silicone, so the bottom and sides of the dough bake more thoroughly.
If there are no special forms:
- a muffin pan will work;
- You can use small ramekins, provided they are heat-resistant;
- Silicone molds are also an option, but the crispiness may be less pronounced.
Ideally, the pastry should be low and not too wide. Pasteis are traditionally compact in size: a small pastry shell generously filled with cream.
Step-by-step recipe for Pasteis
Step 1. Prepare the dough
Take the puff pastry out of the refrigerator. If it’s in sheets, gently roll it out into a rectangle on a floured surface. Then roll it up tightly along the long side. This technique is what creates those beautiful concentric layers after baking.
Cut the roll into 12 roughly equal pieces. Place each piece cut-side up in the pan. Lightly moisten your fingers with cold water and press the dough out from the center toward the edges, forming a basket shape. The bottom should be thinner, and the sides should be slightly higher.
Place the pan with the prepared dough in the refrigerator while you make the cream. Keeping it cold is important: it helps the layers hold their shape and prevents the butter in the dough from softening too soon.
Step 2. Mix the dry base
In a small bowl, mix the flour with 100 ml of cold milk until completely smooth. There should be no lumps. This mixture will help thicken the cream without causing it to curdle.
Measure out the sugar separately. If you’re using a cinnamon stick, prepare it along with a strip of lemon zest.
Step 3. Heat the milk
Pour the remaining milk into a saucepan, then add the sugar, cinnamon, and lemon zest. Heat over medium heat, stirring until the sugar dissolves. You don’t need to bring it to a boil—just heat the mixture thoroughly.
Next, pour in the milk-flour mixture in a thin stream, stirring constantly with a whisk. Cook over low heat until the mixture begins to thicken noticeably. It should become smooth, glossy, and resemble a thin custard.
Step 4. Let the base cool
Remove the saucepan from the heat. Take out the cinnamon stick and lemon zest. Let the mixture sit for 5–7 minutes until it’s no longer hot, but just very warm.
This is an important point. If you add the egg yolks to a base that’s too hot, they may curdle, and the cream will turn out grainy. If the base cools down too much, it will become thick and lumpy.
Step 5. Add the egg yolks and the egg
In a bowl, gently whisk the egg yolks and egg until smooth, without beating them into a fluffy foam. Pour in a few spoonfuls of the warm milk mixture, stir quickly, and then combine everything together.
If you like, add a little vanilla, but not too much. In the classic pastry profile, it’s not vanilla but citrus and cinnamon notes that dominate.
The result should be a smooth, fairly runny batter. It will thicken as it bakes.
Step 6. Fill out the forms
Take the pan with the dough out of the refrigerator. Fill each basket about 3/4 full. Don’t fill them all the way to the top: the cream will rise in the oven.
Step 7. Preheat the oven thoroughly
This is one of the most important secrets. Pasteis require a very hot oven. Ideally, you should bake them at the highest temperature your oven allows.
If your oven doesn’t get very hot, set it to 230–240°C and be sure to preheat it thoroughly for at least 20–30 minutes. It’s best to place the pan in the top third of the oven—this way, the top of the cream will caramelize faster.
Step 8. Bake
Bake the pastries for 12–18 minutes, depending on your oven and the size of the pans. You will need:
- well-risen layers of dough;
- golden or darker edges;
- cream with dark caramelized spots on top.
Don’t be alarmed if the cream rises significantly in the oven. It will settle a bit once it cools—that’s normal.
Step 9. Cool it properly
Let the finished pastries cool in their molds for 5 minutes. Then carefully transfer them to a wire rack. They taste best when warm, when the pastry is still crispy and the filling has set but remains tender.
Serve with a pinch of cinnamon.
A detailed recipe for homemade puff pastry
If you want to make a more professional version, here’s a simplified version you can make at home.
Ingredients for the dough
- 300 g flour
- 160 ml of cold water
- 1/2 tsp salt
- 220 g softened butter
How to make
- Mix the flour, salt, and water into a firm but elastic dough.
- Let it rest for 20 minutes.
- Roll it out into a rectangle.
- Grease 2/3 of the surface with softened butter.
- Fold the dough into a “sheet,” as if for laminating.
- Let it cool for 20 minutes.
- Repeat the rolling and folding process two more times.
- Finally, roll it out into a thin layer and roll it up tightly.
- Let it cool, slice it into rounds, and shape them into baskets.
Secrets to a Delicious Cream
The pastry cream is the heart of the recipe. It shouldn’t be too runny or too thick. Here are the key guidelines.
Do not overheat the milk base
If the mixture boils too vigorously, the texture may become too dense.
Add the egg yolks to the warm, not hot, mixture
This prevents clumping.
Don’t use too much flour
Too much flour makes the cream more pudding-like rather than silky.
Don’t overbake
The pastries finish baking in the oven using the residual heat. If you leave them in too long, the filling will lose its tenderness.
Common mistakes
Siren’s Lair
Reasons: an oven that hasn’t preheated properly, dough that’s too thick, a filling that’s too moist, or a silicone pan.
What to do:
- Preheat the oven thoroughly;
- form a thin bottom;
- use a metal pan;
- Do not overfill the cream.
The cream curdled
Reasons: the base was too hot when the egg yolks were added, or it was cooked for too long.
What to do:
- whisk the egg yolks;
- cook over low heat;
- Strain the cream before filling the molds.
No dark spots on top
Reasons: insufficient temperature or incorrect placement of the pan in the oven.
What to do:
- place in the upper part of the oven;
- preheat the oven to the highest temperature;
- If necessary, turn on the top heating element for the last 1–2 minutes.
The dough isn’t flaky
Reasons: The dough got too warm, the butter melted before baking, and the dough pieces sat on the table for too long.
What to do:
- cool the molds before baking;
- work quickly;
- Do not place the pan near a hot stove.
Variations on Pasteis
Classics are always a safe bet, but it’s helpful to offer alternatives on a blog. That way, you’ll cover more search queries and show your readers that the recipe is versatile.
Pasteis made with ready-made puff pastry
The most convenient version for everyday cooking. Great for beginners.
Pâté with cream
You can replace some of the milk with 10–20% cream. The flavor will be richer, but it’s important not to make the cream too rich.
Pâté with orange zest
If you prefer a brighter citrus flavor, substitute orange for lemon. The taste will be a little milder and sweeter.
Vanilla pastry
You can add a little bit of natural vanilla. It’s not the traditional way, but many people like it.
Chocolate pastries
Add 40–60 g of melted dark chocolate to the finished cream. The result is a dessert in the style of a “Portuguese classic with a modern twist.”
Coffee pastries
You can add 1 teaspoon of instant coffee or a little espresso powder to the milk. It’s a great option to serve with your morning coffee.
Less sweet pastries
Reduce the sugar to 150–160 g. This version will appeal to those who don’t like overly sweet desserts.
How to serve pastries

Pastries taste best:
- warm;
- on the day of baking;
- with an espresso or cappuccino;
- with a pinch of cinnamon;
- without elaborate decoration.
This is one of those cases where simplicity beats excess. There’s no need to cover them with glaze, cream, or syrup. Their beauty lies in their caramelized top, flaky crust, and tender center.
Pasteis are perfect for food photography:
- Show one cake in cross-section;
- add a cinnamon stick, a lemon, and a sieve of powdered sugar;
- Use warm side lighting;
- Take both a wide shot and a close-up of the texture.
Can you make pashtesh in advance?
Yes, but there are some caveats.
You can prepare this in advance:
- cream — within 1 day;
- shaped dough baskets — in a few hours;
- Fully cooked pastries are also an option, but they lose some of their crispiness.
How to store
- In the refrigerator for up to 2 days.
- In a sealed container after it has cooled completely.
How to refresh
Bake for 4–6 minutes in an oven preheated to 180–190°C. It’s best not to use a microwave: the dough will become soft.
Can it be frozen?
So, it’s best not to freeze ready-made pâtés, but rather:
- or shaped dough baskets;
- or completely raw preparations that do not require baking;
- or the dough separately.
Once frozen, baked pastries lose some of their texture, though they still taste good. For the blog, this can be presented as a practical tip for busy readers: prepare the dough in advance and bake it when you need it.
Tips for Perfect Results
- Use a metal pan.
- Keep the dough cold.
- Don’t fill it to the top.
- Preheat the oven to the highest setting.
- Place the pan closer to the top.
- Don’t be alarmed by dark spots on the surface.
- Let the pâté sit for 5 minutes to cool down after taking it out of the oven.
- It tastes best on the day it’s baked.
Short version of the recipe for the card
Ingredients
- 500 g of unleavened puff pastry
- 500 ml of milk
- 180–200 g sugar
- 35 g flour
- 6 egg yolks
- 1 egg
- Cinnamon stick
- A strip of lemon zest
Preparation
- Roll the puff pastry into a log, slice it into rounds, and arrange them in the pans.
- Mix some of the milk with the flour.
- Heat the remaining milk with the sugar, cinnamon, and zest.
- Pour in the flour mixture and cook until slightly thickened.
- Let it cool slightly.
- Add the egg yolks and the egg.
- Fill the baskets 3/4 full.
- Bake at the highest temperature for 12–18 minutes until the top is caramelized.
Frequently Asked Questions
What is pashtesh de nata?
Pastéis de nata are Portuguese pastries made of puff pastry and a custard filling.
How do pastries differ from regular cream-filled tartlets?
A combination of flaky pastry, a custard filling, the aroma of cinnamon and lemon, and a distinctive caramelized top.
Why are there dark spots on the surface?
Because this is a sign that the cream has caramelized properly during a short bake at a high temperature.
What temperature is needed for pastries?
Ideally, set it to the highest temperature your oven can reach. At home, temperatures of 230–250°C are typically used.
Can you make pastries using store-bought dough?
Yes, and for most home kitchens, this is the most convenient option.
Can you make it without lemon?
Yes, but the flavor will be less traditional. Lemon zest adds the right touch of freshness.
Is cinnamon a must?
In the traditional flavor profile, this is almost the case, as it gives this dessert its distinctive aroma.
Can we use less sugar?
Yes. If you don’t like very sweet desserts, reduce the amount to 150–160 g.
Why is the cream so runny?
This is usually caused by the batter not being thick enough, too much liquid, or underbaking.
Can you bake pastries in silicone molds?
It’s possible, but the bottom often turns out less crispy than with metal pans.
How long do pastries stay fresh?
They’re best eaten on the day they’re baked, but they can be stored in the refrigerator for up to two days.
How should you serve pastries?
They are usually served warm, with cinnamon and, if desired, with powdered sugar.
Final text
Pasteis de nata is a legendary Portuguese dessert that combines everything we love about homemade pastries: flaky puff pastry, delicate custard, the warm aroma of cinnamon, and a subtle citrus note. These little pastries have long been a hallmark of Portugal, and their history is closely tied to Lisbon. Today, pastéis de nata are baked all over the world, but the secret to their appeal remains the same: contrasting textures, the right cream, and a very hot oven.
If you’ve been looking for a detailed recipe for pastéis that you can actually make at home, the good news is that you don’t have to be a professional pastry chef to get great results. The most important thing is to choose high-quality puff pastry, make a smooth custard without lumps, avoid overheating the egg yolks, and bake the pastries at the highest possible temperature. That’s when you’ll get the perfect result: crispy sides, a flaky bottom, and an appetizing top with caramelized spots.
Homemade pastéis de nata are perfect for a festive table, morning coffee, or a beautiful food photo shoot. They look elegant but are made with readily available ingredients. This is one of those recipes that makes a big impression on guests without requiring elaborate decoration or expensive ingredients. If you love puff pastry desserts, cream tarts, or want to try something from Portuguese cuisine, pastéis de nata definitely deserve a spot on your menu.
To make homemade pastries, you’ll need puff pastry, milk, egg yolks, an egg, sugar, flour, cinnamon, and lemon zest. You can find all of these ingredients at almost any store. For home cooking, a simple and straightforward method is more than enough—it delivers consistent results without any extra hassle.
Start with the dough. If you’re using store-bought puff pastry, it’s best not to just cut it into circles, but to roll it out slightly, roll it into a log, and only then slice it into rounds. When you press these rounds into the molds with your fingers, beautiful layers form, which become especially crispy after baking. It’s a small detail, but it’s exactly what noticeably improves the texture.
Once the dough is prepared, place the pan in the refrigerator. While it’s chilling, you can start on the filling. Mix some of the milk with the flour until smooth, and heat the rest with sugar, cinnamon, and lemon zest. Then combine everything and cook until slightly thickened. It’s very important not to let the mixture get too thick while it’s still on the stove, because it will continue to thicken in the oven. The final consistency should be silky, not too thick.
Once the base has cooled slightly, add the egg yolks and the egg. Don’t rush this step: if the milk mixture is too hot, the yolks may curdle. It’s best to temper them first with a few spoonfuls of the warm mixture, and only then pour them into the main mixture. If necessary, you can strain the cream—especially if you want a very smooth texture for beautiful photos and the cleanest possible slice.
Fill the prepared pastry shells about three-quarters full. Don’t fill them any further, as the cream will rise significantly during baking. Next comes the most important step—baking. Pastéis don’t do well at moderate temperatures. To achieve their characteristic texture and dark spots on the surface, they need high heat.
If your oven can reach 250°C or higher—great. If not, set it to the highest temperature, but let the oven preheat longer and place the pan on the top rack. The goal is for the pastry to puff up quickly, and for the top of the cream to caramelize slightly without drying out. It’s this short, intense baking that gives the pastry its signature flavor, making it so easily recognizable.
There’s no need to remove the finished pastries from the pan right away. Let them sit for a few minutes to set. While they’re still warm, the cream stays especially smooth, and the layers of pastry are as crispy as possible. They’re best served without elaborate garnishes: a little cinnamon, a light dusting of powdered sugar if desired, and that’s enough. In this dessert, it’s not the decoration that matters, but the right balance of textures and flavors.
One of the great things about pastries is the wide variety of options. If you want to stay true to the original, make your own puff pastry and use a cinnamon stick and fresh lemon zest. If you need a quick homemade version, use store-bought dough. If you prefer richer desserts, replace some of the milk with heavy cream. If you want a more modern twist, add a little vanilla, orange zest, or even chocolate. The foundation of this dessert is so strong that it easily accommodates light creative variations.
Another advantage is that this recipe is easy to adapt to different levels of culinary experience. A beginner can simply use store-bought dough and carefully prepare the cream. A more experienced cook will make homemade puff pastry and achieve a more pronounced flakiness. And for a food blogger, pastries are the perfect subject: a beautiful top, an appetizing cross-section, golden edges, and a cozy presentation style.
When it comes to flavor, a good pastéis should never be just a sweet treat. It must have depth: a hint of creaminess, a touch of caramel, a delicate egg note, a hint of cinnamon, and a subtle hint of lemon freshness. When these elements are balanced, the dessert isn’t cloyingly sweet, but rather refined and very harmonious.
To put it simply, you need just three things to make perfect homemade pastéis: cold puff pastry, a smooth cream filling, and a very hot oven. Everything else comes down to attention to detail. And once you take your first batch of these golden Portuguese pastries out of the oven, you’ll understand why pastéis de nata have remained one of the world’s most beloved desserts for so many years.