
Content
1. Introduction: The cultural code of Ukrainians
In Ukraine, holodets is more than just an item on the menu. It is a ritual dish. Its preparation usually precedes the biggest holidays of the year: Christmas, Easter, and New Year’s. It is a sign that the household is prosperous and that the hosts are willing to spend two days preparing to impress their guests.
In an age when we are accustomed to fast food and “15-minute” meals, aspic remains an outpost of Slow Food. It is impossible to speed up the process without spoiling its essence. It requires attention, respect for the product, and patience. This article is designed to help you, regardless of your experience, prepare the same dish that will tremble on the fork and melt in your mouth, eliciting admiration (and a little envy) from your guests.
2. History and geography: Dragli, studenets, zalivne — what is the difference?
These concepts are often confused, but in culinary theory there are clear boundaries:
- Kholodets (Dragli/Studenez): A traditional Ukrainian dish that solidifies exclusively thanks to gelling agents boiled down from bones and cartilage. No artificial gelatin! The consistency is dense and rich, and the meat part consists of separated fibers.
- Aspic: A more “refined” dish, often served in restaurants. It is usually made from lean meat, fish, or tongue. Since these products contain little collagen, gelatin is always added to the broth. The broth in aspic is always perfectly clear, and the ingredients are arranged artistically.
- Zelts (Saltison): This is essentially pressed aspic in a casing (stomach or intestine), where the ratio of meat to jelly is significantly higher in favor of meat.
We focus specifically on classic aspic — without adding a packet of gelatin from the store.
3. The science of aspic: What are collagen and hydrolysis?
To cook consciously, you need to understand physics.
The main ingredient in aspic is collagen protein. It is found in the connective tissues of animals (tendons, cartilage, skin, bones). Raw collagen itself is very strong (try chewing raw tendon — it’s impossible).
However, under the influence of temperature and water over a long period of time, hydrolysis occurs. Collagen breaks down and turns into gluten (not to be confused with gluten!). Gluten dissolves in hot water, making the broth sticky.
The magic of solidification:
When the broth cools, the gluten molecules begin to reconnect, forming a three-dimensional mesh. This mesh “captures” water inside itself. This is how the liquid turns into a gel.
The older the animal, the stronger the collagen bonds, and the richer the aspic will be. Therefore, an “old rooster” is better than a “young chicken” for aspic.
4. Stage 1: Hunting for ingredients (Market guide)
The perfect aspic is not made in the kitchen, but at the market. Your task is to assemble a “jelly constructor.”
Proportion rule: For guaranteed setting, the ratio of “gelatinous parts” to “meaty parts” should be 1:1 or 1:1.5.
Pig arsenal (Adhesion base)
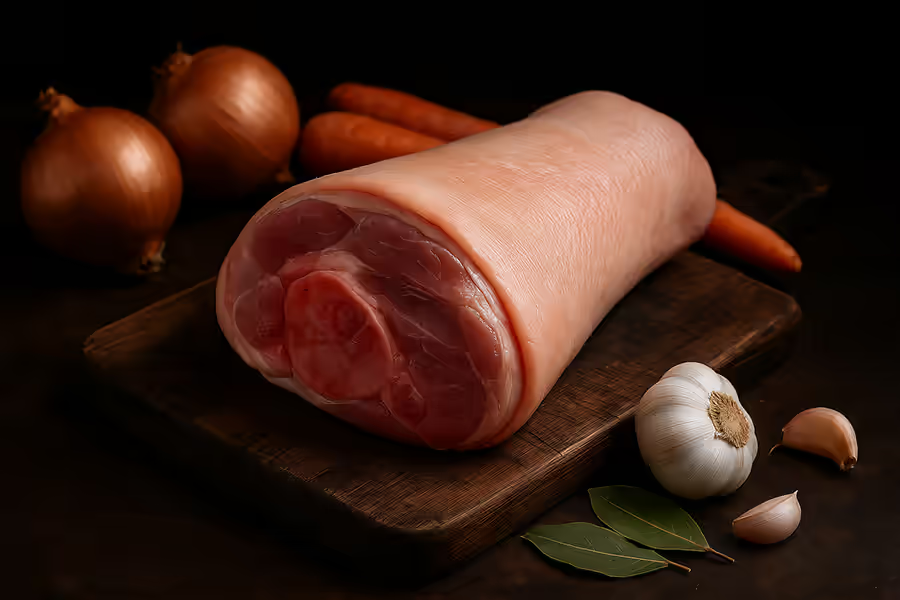
- Hooves (hooves, legs): These are the "cement" of your aspic. Take only the front or rear lower parts with the hoof.
- How to choose: Light-colored skin, no spots, fresh smell. Ask the butcher to cut them lengthwise—this way the collagen will cook faster.
- Shank (lower leg): Perfect balance. It has a large bone, skin, tendons, and plenty of delicious dark meat.
- Pig ears: The secret weapon of thrifty housewives. Ears provide tremendous stickiness.
- Skin: If you buy meat for cutlets and cut off the skin, don’t throw it away. Freeze it for aspic.
Beef Arsenal (Aroma and Transparency)
- Motoliga (sugar bone, knee joint): A large bone with a joint. It provides less stickiness than pig’s feet, but makes the broth clear and fragrant.
- Tails: A delicacy. Contains a significant amount of connective tissue. Jellied meat made from tails is tender.
- Lips and cheeks: A specific product, but very rich in collagen.
Bird Arsenal (Lightness)
- Paws: The same ones, with claws. Cheap and cheerful. They give a crispy texture without changing the taste of the chicken.
- Necks (turkey or chicken): Lots of bones and meat.
- Domestic rooster/hen: Look for a bird with yellow skin and blue veins. It will cook for 4-5 hours and produce an incredible golden broth.
5. Step 2: Meat preparation and hygiene
You brought your “booty” home. What next?
- Singeing: Carefully examine the legs and ears. If there are any remaining bristles, singe them over a gas burner or dry fuel. The smell of burning will wash off, but bristles in the plate are a disaster.
- Soaking (Must Do!): Place all meat in a large basin or pot and cover with cold water.
- Time: At least 3 hours, preferably overnight.
- Purpose: Water washes away blood residue from the capillaries. The less blood there is, the less foam (noise) there will be and the clearer the broth will be. It also softens the skin for cleaning.
- Scrubbing: After soaking, take a small knife and scrape the skin on the legs and neck. It should turn white/light pink. Remove any calloused particles from the hooves, if present.
6. Stage 3: Large-scale cooking (technology)
Equipment: You will need the largest pot in your home (6, 8, or 10 liters). Preferably with a thick bottom.
Step 1: First water
Place the meat very tightly (like Tetris). Pour in water so that it just covers the meat. Bring to a boil over high heat.
As soon as a layer of dirty foam appears, boil for 2-3 minutes and pour everything into the sink without mercy.
Rinse the meat under the tap to remove any remaining foam. Wash the pot.
Why is this important? It removes the “barn” smell and greasy aftertaste.
Step 2: Tab and Water
Put the clean meat back into a clean pot. Pour in cold drinking (filtered) water. Water
level: This is an eternal question. Ideally, the water should be 2-3 cm (about two fingers) above the meat.
If you pour in too much, it won’t set. If you pour in too little, it will boil away and the meat will stick out.
Step 3: Simmer mode
Bring to a boil and immediately reduce the heat to low. Bubble
rule: The surface of the water should barely ripple. One bubble should rise every 30-40 seconds. The lid should be slightly open (to allow steam to escape) so that the broth does not “choke” and become cloudy from active boiling.
Cooking time:
- Pork/Beef: 6–7 hours.
- Chicken (domestic): 4–5 hours.
- Store-bought chicken (only legs and wings): 3 hours (but you need meat for flavor).
2 hours before the end: Add the vegetables.
- Onions: 2 pieces. Peel one, leave the other in its last layer of skin (wash it!). The skin will give the broth a beautiful amber color.
- Carrots: 1-2 large pieces (they add sweetness).
- Celery root or parsley root: Essential for depth of flavor.
7. Stage 4: The Magic of Taste (Salt and Spices)
When to salt?
- Mistake: Add salt at the beginning. The water will boil away, and you will end up with an oversalted product.
- Correct: Salt 30-60 minutes before the end.
How much salt?
The broth should taste slightly oversalted. Hot, fatty broth “hides” the salt. When it cools down, the taste will even out. If you salt it “normally” when hot, the cold aspic will taste bland.
Spices (20 minutes before the end):
- Bay leaves (3-4 pieces) — no more than that, otherwise it will taste bitter. Be sure to remove them after turning off the heat!
- Black peppercorns (15-20 pieces).
- Allspice (5-7 pieces).
- Optional: cloves (1-2 pieces) for spice (be careful, very strong aroma).
Garlic: The final touch
Garlic should not be cooked for hours! It loses its flavor and becomes unpleasant.
- Turn off the heat under the pot.
- Take 1-2 heads of garlic (yes, heads, not cloves!).
- Pass through a press or grate on a fine grater.
- Add to hot (but not boiling) broth.
- Cover with a lid and let it steep for 20 minutes. This will give it the strongest aroma.
8. Stage 5: The fight for transparency (Clarification)
You have removed the meat with a slotted spoon into a bowl. You are left with a pot of golden liquid.
Step 1: Remove the fat.
The layer of fat on top acts as a preservative if you plan to store the aspic under a lid for a long time. But it looks unattractive on a plate and tastes unpleasant.
- Paper towel method: Carefully place a dry paper towel on the surface of the liquid. It will instantly absorb the grease. Lift it up by the edge and throw it away. Repeat 5-6 times until there are almost no grease stains left.
Step 2: Straining.
Take a colander and line it with 4 layers of cheesecloth. Strain the broth. Discard the cooked vegetables, pepper, and bay leaf. They have already done their job.
Step 3: “Draining” (Only if the broth is cloudy!).
If you missed the strong boiling and the broth is white like milk:
- Cool the broth to 60°C.
- Beat 2 egg whites into a stiff foam. You can add a little vinegar or lemon juice.
- Add the foam to the broth and stir.
- Put it on low heat and bring to a boil. The protein will curdle into a “cap,” drawing all the dirt into itself.
- Carefully remove the cap and strain through cheesecloth again. The broth will become crystal clear.
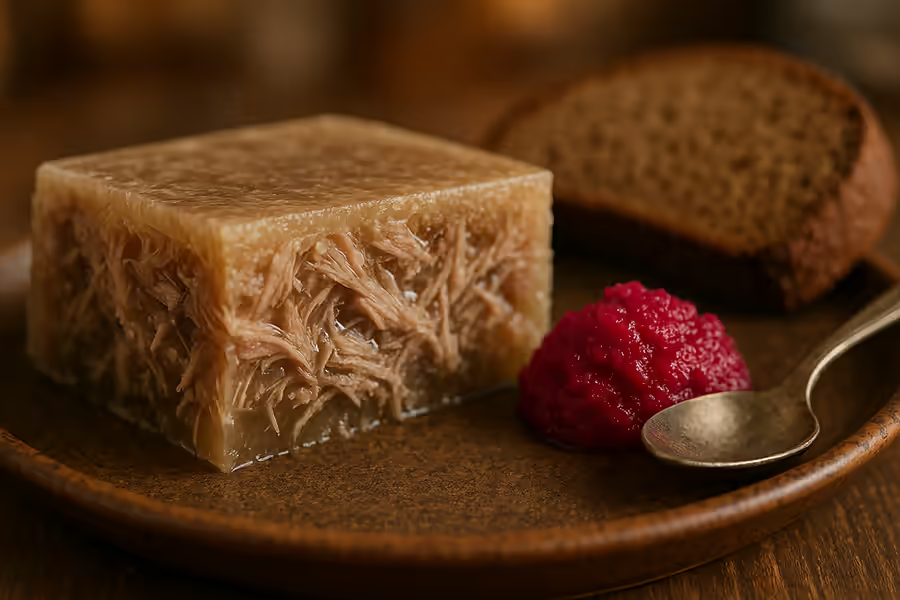
9. Step 6: Disassembly and Decoration
The meat has cooled down a little. Put on latex gloves (hygiene + protection of hands from grease).
- Sorting: Separate the meat from the bones. Bones — to dogs or in the trash. Skin and cartilage — to taste (some people love to chew them, others hate them). You can mince the skin in a meat grinder and mix it with the meat for juiciness.
- Grinding:
- Authentic method: Separate into fibers by hand.
- Restaurant: Cut into 1×1 cm cubes with a knife.
- Not recommended: Meat grinder (will produce pâté).
- Arrangement: Place the decoration on the bottom of the mold (so that it is on top when turned over) or pour in a layer of broth, allow to set, place the decoration, then the meat, and broth again (for complex compositions).
- Classic garnish: Slices of boiled carrots, parsley, half a boiled egg.
10. Top 3 proven recipes
1. Classic Ukrainian “Festive”
- Ingredients: 2 pork trotters, 1 pork knuckle (rear), 500 g beef brisket.
- Features: Cooks for 6.5 hours. The result is very thick, rich, and filling. The broth is dark and rich in color.
- Tip: Be sure to add plenty of garlic at the end.
2. Poultry “Diet” (Halal/Kosher variations)
- Ingredients: 1 kg chicken feet (claws removed), 2 turkey wings, 500 g turkey fillet or chicken thighs.
- Features: Cooks for 4-5 hours. Very delicate flavor. Ideal for children and the elderly.
- Tip: To make the broth golden, add a whole unpeeled onion and a pinch of turmeric to the water 10 minutes before the end.
3. Jellied meat in a multicooker “No problem”
- Ingredients: 1 pork knuckle, 1 chicken leg, spices.
- Process:
- Blanch the meat with boiling water (or boil for 5 minutes on the stove and drain).
- Place in a bowl, add vegetables, spices, and water up to the maximum mark.
- Stew mode for 6-7 hours OR Pressure cooker/Jellied meat mode (under pressure) for 90 minutes.
- Plus: Transparency guaranteed (because it doesn’t boil). Minus: Small bowl volume.
11. What to serve with: Sauces
Jellied meat without horseradish is money down the drain.
Homemade horseradish with beetroot (Cvikla)
- Peel the horseradish root (200 g).
- Peel the boiled beetroot (200 g).
- Grind everything in a meat grinder (put a bag over the outlet so you don’t cry!).
- Add: 1 tablespoon vinegar, 1 teaspoon salt, 1 teaspoon sugar. Stir, place in a jar. Leave to infuse for 24 hours.
Strong Mustard
- Mustard powder (50 g).
- Pour boiling water over it and stir until it reaches the consistency of sour cream.
- Add 1 teaspoon of sugar, a pinch of salt, 1 teaspoon of oil, and 1 teaspoon of vinegar.
- Leave in a warm place overnight.
12. Health and Dietetics
Jellied meat is unfairly demonized because of cholesterol. In fact, it is a superfood:
- Chondroprotector: A natural source of glucosamine and chondroitin. Beneficial for joints, especially for older people and athletes.
- Collagen bomb: Improves the condition of skin, hair, and nails better than expensive dietary supplements.
- Glycine: An amino acid that calms the nervous system and improves sleep.
- Keto/Paleo: An ideal dish for low-carb diets (if not eaten with bread).
13. What to do if…
- …The jelly has not set:
Check for stickiness: dip your fingers in the cooled broth and squeeze them together. If your fingers stick together so that it is difficult to separate them, it will set. If not, add gelatin (20 g per 1 liter). - …The aspic is too fatty:
Remove the fat with a spoon from the solidified aspic before serving. - …Overcooked:
Boil some plain broth (or just boiling water) separately, add gelatin, and dilute the main mixture with it. - …It’s cloudy:
This is purely an aesthetic issue. It doesn’t affect the taste. Call it “rustic style” and don’t worry about it.
14. FAQ: Frequently asked questions
Q: Can aspic be frozen?
A: Yes, but it’s a one-way ticket. After thawing, it will melt and lose its jelly-like structure. It can only be used as a base for soup (hash, borscht) or sauce.
Q: How many days can it be stored in the refrigerator?
A: 3-5 days is optimal. Up to 7 days if there is a layer of fat on top (it prevents bacteria from growing). If liquid appears around the edges, boil it immediately and consume it (or discard it).
Q: Should gelatin be added “just in case”?
A: True masters consider this to be cheating. But if you are unsure about the quality of the trotters or are cooking with chicken, it is better to play it safe. Add 1/3 of the gelatin amount indicated on the package. It will not spoil the taste and will save your nerves.
Q: How can I cool down a pot quickly?
A: In winter, place it on the balcony. In summer, place the pot in a bathtub filled with cold water and ice. Do not place hot items in the refrigerator, as this may damage the appliance.
Final tip:
Making aspic is an act of love. Don’t be afraid to experiment. Add a piece of smoked bacon during cooking for a smoky aroma, or try a mix of turkey and beef. The main thing is to cook with love, and your aspic will become legendary among your friends and family.
Bon appetit and happy holidays!
1. Підготовка м'яса: Ретельно очистіть свинячі ратиці та рульку, пошкрябайте ножем шкурку. Залийте м'ясо холодною водою на 3-4 години, щоб вийшла зайва кров. 2. Перше варіння: Складіть м'ясо в каструлю, залийте водою, доведіть до кипіння. Проваріть 3-5 хвилин, зніміть піну і повністю злийте першу воду. Промийте м'ясо та каструлю. 3. Основне варіння: Залийте чисте м'ясо свіжою водою (на 2-3 см вище рівня м'яса). Доведіть до кипіння і зменшіть вогонь до мінімуму. Варіть під кришкою 6-7 годин при слабкому кипінні (одна бульбашка раз на хвилину). 4. Овочі та спеції: За 1.5 години до кінця додайте цілу моркву та цибулю. За 20 хвилин до кінця додайте перець, лавровий лист і сіль. Бульйон має бути трохи пересоленим. 5. Часник: Вимкніть вогонь. Вийміть м'ясо. У гарячий бульйон додайте пропущений через прес часник. Дайте настоятися 20 хвилин. 6. Проціджування: Зніміть жир з поверхні паперовим рушником. Процідіть бульйон через марлю. 7. Формування: Розберіть м'ясо на волокна, викладіть у форми. Залийте теплим бульйоном. Поставте в холодильник до повного застигання (мінімум на 5 годин).
Інгредієнти
Інструкція